Contents
Section 1: Setting Up WSL, Docker, and Optional CUDA Support on Windows
- Introduction, Section 1
- Part 1: Installing WSL and Ubuntu
- Part 2: Installing Docker Desktop with WSL 2 Integration
- Part 3: Docker Desktop Welcome Screen – Signing In or Skipping
- Part 4: Docker Desktop Interface
- Part 5: NVIDIA CUDA Support Installation
- Summary of Section 1
Section 2: Installing and Running Llama 3.2 Vision for Image Recognition in Docker on WSL
- Introduction, Section 2
- Step 1: Set Up Ollama in Docker
- Step 2: Pull the Llama 3.2-Vision Model
- Step 3: Testing in FileMaker
- Step 4: Set Up Resource Allocation for Docker
- Step 5: Expand to the 90B Model (Optional)
- Summary of Section 2
Introduction, Section1
Purpose of This Guide
This guide provides a step-by-step approach to setting up a portable AI environment using Docker on Windows Subsystem for Linux (WSL). We’re focusing on creating a flexible setup that allows you to run large language models, such as those available with Ollama, in an offline and secure environment. This setup is particularly useful for organizations or individuals who need to work without direct internet access or who want the flexibility to move their setup between different machines.
Running Ollama on CPU or GPU
While this guide includes instructions for setting up GPU acceleration with NVIDIA CUDA, having an NVIDIA GPU is not required to follow these steps. If you don’t have access to NVIDIA hardware or simply want to run models on the CPU, you can still complete this guide successfully. Docker provides the flexibility to run on both CPU-only and GPU-enabled systems, meaning you can use this setup regardless of your hardware configuration.
Benefits of This Setup
- Portability: This setup is designed to be portable, allowing you to move your environment across machines by simply copying the Docker images and configurations.
- Offline and Secure: By containerizing the setup, you ensure that all AI processing can occur offline and securely, ideal for use cases where data privacy is critical.
- Flexibility for Different Systems: With Docker, you can run this environment on various platforms, including Windows, Linux, and macOS, using either CPU or GPU resources as available.
Overview of What You’ll Set Up
In this guide, you will:
- Set up WSL on Windows to enable a Linux-based environment on your Windows machine.
- Install Docker in WSL to manage containerized applications, like Ollama.
- Configure CUDA and NVIDIA GPU support (optional, for those with NVIDIA GPUs) to enable accelerated model processing.
- Pull and run Ollama’s Docker images to host large language models locally, either with GPU support or on the CPU.
For GPU and CPU Users
- With NVIDIA GPU: Users with NVIDIA GPUs will benefit from CUDA-based GPU acceleration for faster AI processing.
- Without NVIDIA GPU: If you don’t have an NVIDIA GPU, you can still follow this guide and run models on the CPU, although processing times will be slower.
By following this guide, you’ll establish a robust and portable setup for hosting and running AI models in a containerized environment. Let’s get started!
Prerequisite Step: Adding wsl.exe to the PATH Environment Variable
1. Locate the WSL Executable Path
The wsl.exe file is typically located in: C:\Windows\System32
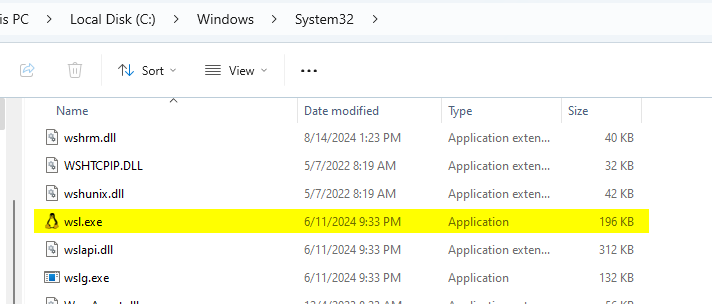
2. Add C:\Windows\System32 to the PATH
Open PowerShell as Administrator
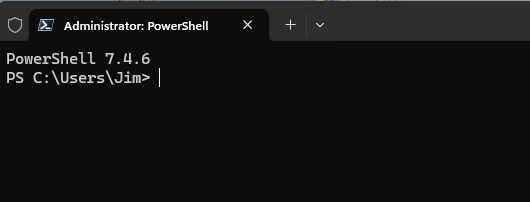
and run the following command to add C:\Windows\System32 to the PATH for the current user:

[Environment]::SetEnvironmentVariable("Path", $env:Path + ";C:\Windows\System32", [System.EnvironmentVariableTarget]::Machine)This allows you to run wsl commands from any terminal without specifying the full path.
3. Restart PowerShell
Close PowerShell and open it again to apply the changes.
4. Verify wsl Access
Verify that wsl is in the PATH by running a simple WSL command, such as:
wsl --list --online 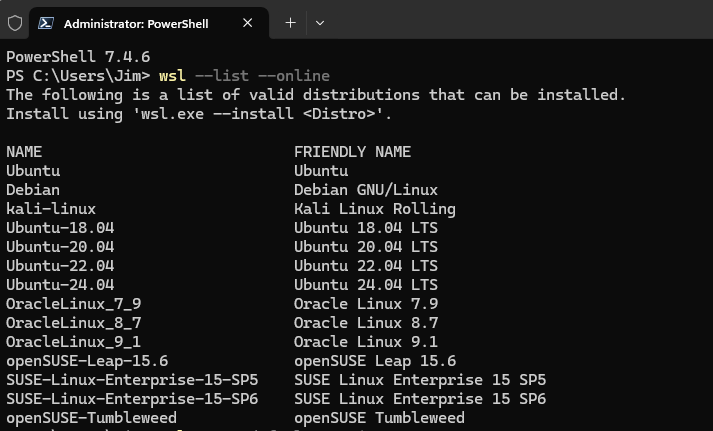
This command lists available Linux distributions for installation. If this command runs successfully, then wsl.exe is accessible from the PATH.
Part 1: Installing WSL and Ubuntu
1. Enable WSL on Windows
There are 2 options to install WSL, a) using the current default and b) selecting a desired one
a) By default, wsl --install will install the latest stable Ubuntu version.
To begin, enable Windows Subsystem for Linux (WSL) and the Virtual Machine Platform on your Windows 11 machine:
Open PowerShell as Administrator and run:
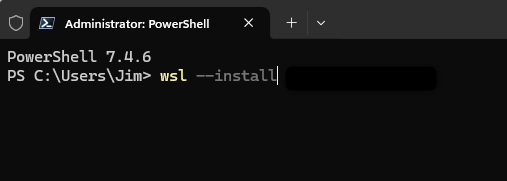
wsl --installThis command installs WSL and a default Linux distribution (Ubuntu).
b) However, you can specify a different version or distribution if desired:
To install a specific distribution, use:
wsl --install -d <DistroName>Replace <DistroName> with one of the names from the list generated by wsl --list --online, for example:

For Ubuntu 22.04 LTS: wsl --install -d Ubuntu-22.04
For Ubuntu 24.04 LTS: wsl --install -d Ubuntu-24.04
This command provides more flexibility to select the desired distribution or version, ensuring compatibility with your requirements.
2. Restart Windows
After installation, restart your computer to apply the changes.
3. Set Up Ubuntu on WSL
After rebooting, open Ubuntu from the Start Menu.
You’ll be prompted to create a new UNIX user and password. Follow the instructions to complete the initial setup.
4. Use PowerShell to interact with Ubuntu on WSL
Open PowerShell as administrator and type:
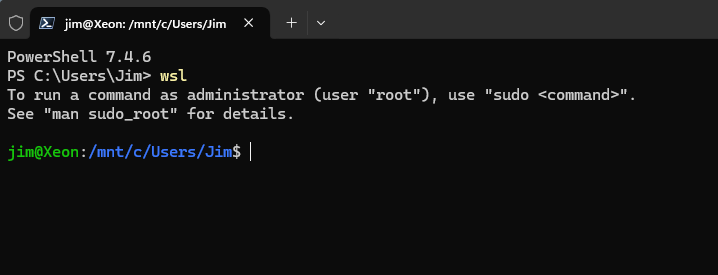
wslThis will start Windows subsystem for Linux if it is not already started and give you the ability to interact with Ubuntu from PowerShell.
Verify the default version is WSL 2 (recommended for GPU support) by running:
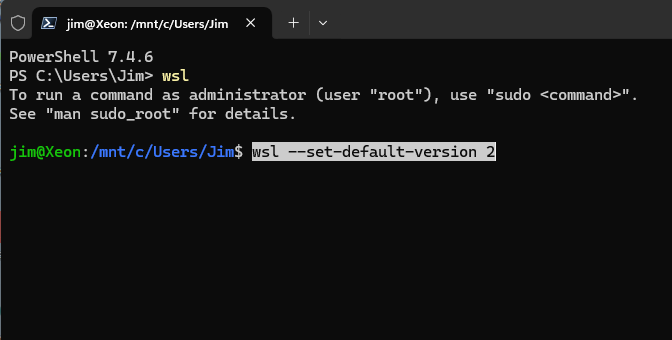
wsl --set-default-version 25. Confirm Ubuntu Version
To identify your Ubuntu version, which is essential for compatibility with CUDA, run:
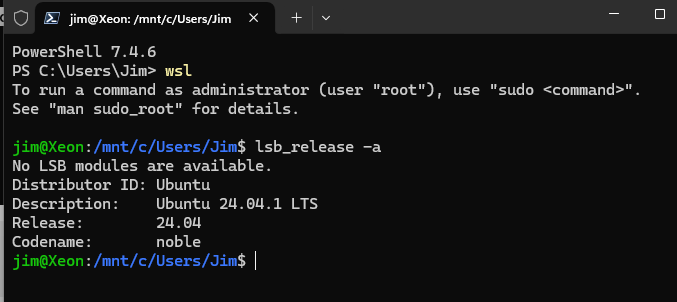
lsb_release -aIn this case, we confirmed you’re using Ubuntu 24.04.
Part 2: Installing Docker Desktop with WSL 2 Integration
Step 1: Download Docker Desktop
- Go to Docker’s official download page and download Docker Desktop for Windows. Docker Desktop provides a GUI (Graphical User Interface) for managing and running containers on your system.
Step 2: Run the Docker Desktop Installer
Locate and Run the Installer
Double-click the downloaded installer to begin the installation process.
Follow the Installation Prompts
You will see a configuration screen:
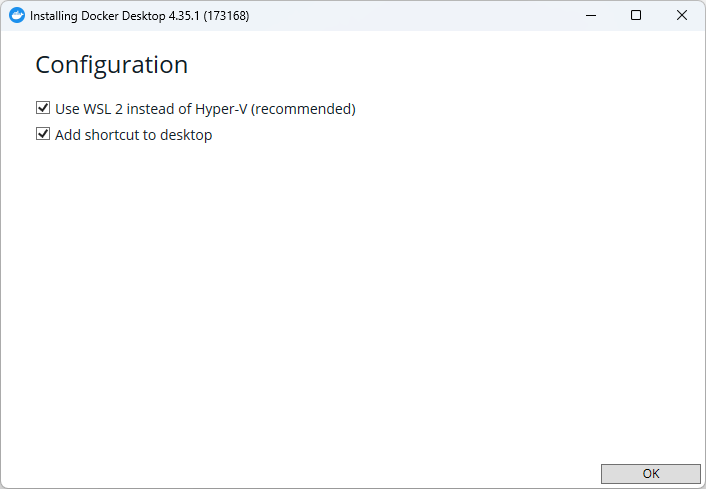
Ensure the option “Use WSL 2 instead of Hyper-V (recommended)” is checked to allow Docker to use WSL, enabling efficient management of Linux containers.
You may also add a shortcut to the desktop if desired.
Step 3: Restart After Installation
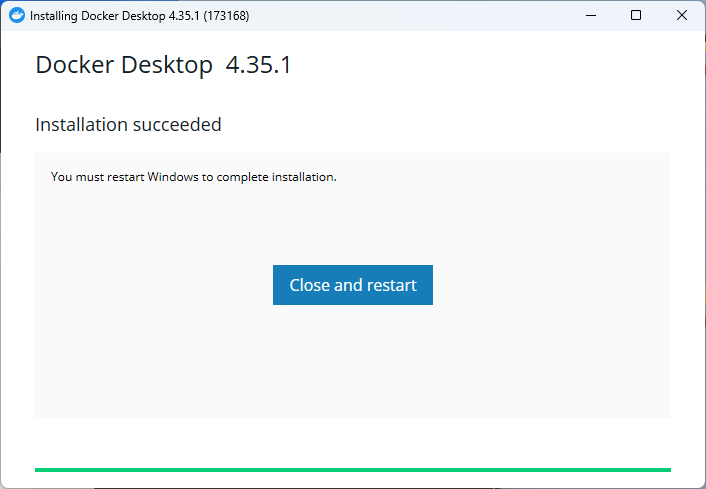
After completing the installation, you’ll be prompted to restart your computer to apply system-level changes required by Docker Desktop.
Part 3: Docker Desktop Welcome Screen – Signing In or Skipping
Welcome Screen Options – Sign In or Skip
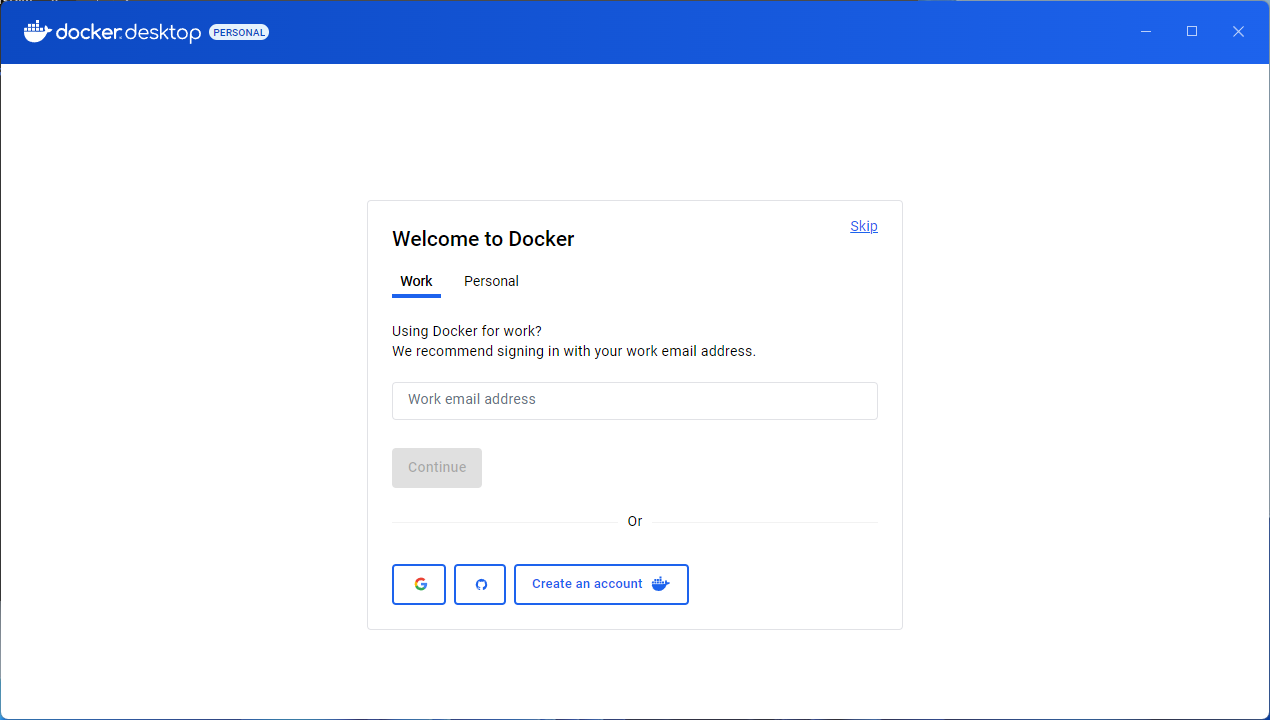
Option 1: Signing In
Why Sign In?
Signing in to Docker Desktop with a Docker Hub account offers benefits like:
Access to Private Repositories: Allows pulling Docker images from private repositories on Docker Hub.
Syncing with Docker Hub: Synchronizes your local Docker setup with your Docker Hub account, providing easy access to images, starred repositories, and automated builds.
Pushing Images: Enables you to directly push images created locally to Docker Hub for storage or sharing.
How to Sign In?
Enter your Docker Hub credentials directly or use one of the quick sign-in options via Google or GitHub (if accounts are linked).
Option 2: Skipping Sign-In
Why Skip?
If you don’t need Docker Hub features or private repositories, you can skip the sign-in step. Docker Desktop will still be fully functional for local development.
Local Use Only: You will still be able to create, run, and manage containers, images, and networks on your machine without connecting to Docker Hub.
How to Skip?
Simply click “Skip” at the top-right corner of the screen.
After Signing In or Skipping
- Docker Desktop will complete the setup and connect with WSL, providing a unified environment accessible through both the Docker Desktop GUI and CLI (Command-Line Interface).
Explanation of Docker Hub Features (for Signed-In Users)
- Pulling Images from Private Repositories
- Docker Hub allows storage of images in both public and private repositories. If you are signed in, you can pull images from your private repositories seamlessly, which is useful for proprietary projects.
- Example Command:
docker pull username/repository-name - Note: Private repositories are limited in free Docker Hub accounts; a paid plan increases this limit and unlocks additional features.
- Syncing with Docker Hub
- Once signed in, Docker Desktop syncs with your Docker Hub account, allowing you to:
- View and manage all repositories (public and private).
- Access starred repositories for quick reference.
- Push updates from local images to Docker Hub, allowing for easy sharing and access across multiple machines.
- Once signed in, Docker Desktop syncs with your Docker Hub account, allowing you to:
- Creating Private Repositories
- How to Create:
- Log in to hub.docker.com, navigate to
Repositories > Create Repository. - Choose a name, set visibility to Private, and follow prompts to complete.
- Push images from your local Docker environment to this private repository as needed.
- Log in to hub.docker.com, navigate to
- Benefits of Private Repositories:
- Controlled Access: Share with specific collaborators without exposing it publicly.
- Intellectual Property Protection: Secure proprietary software and configurations.
- Secure Collaboration: Ideal for teams needing secure shared access to Docker images.
- How to Create:
Part 4: Docker Desktop Interface
Step 1: Docker Desktop Interface Overview
Upon opening Docker Desktop after signing in or skipping the login, new users will be greeted with the main interface, which displays the following sections:
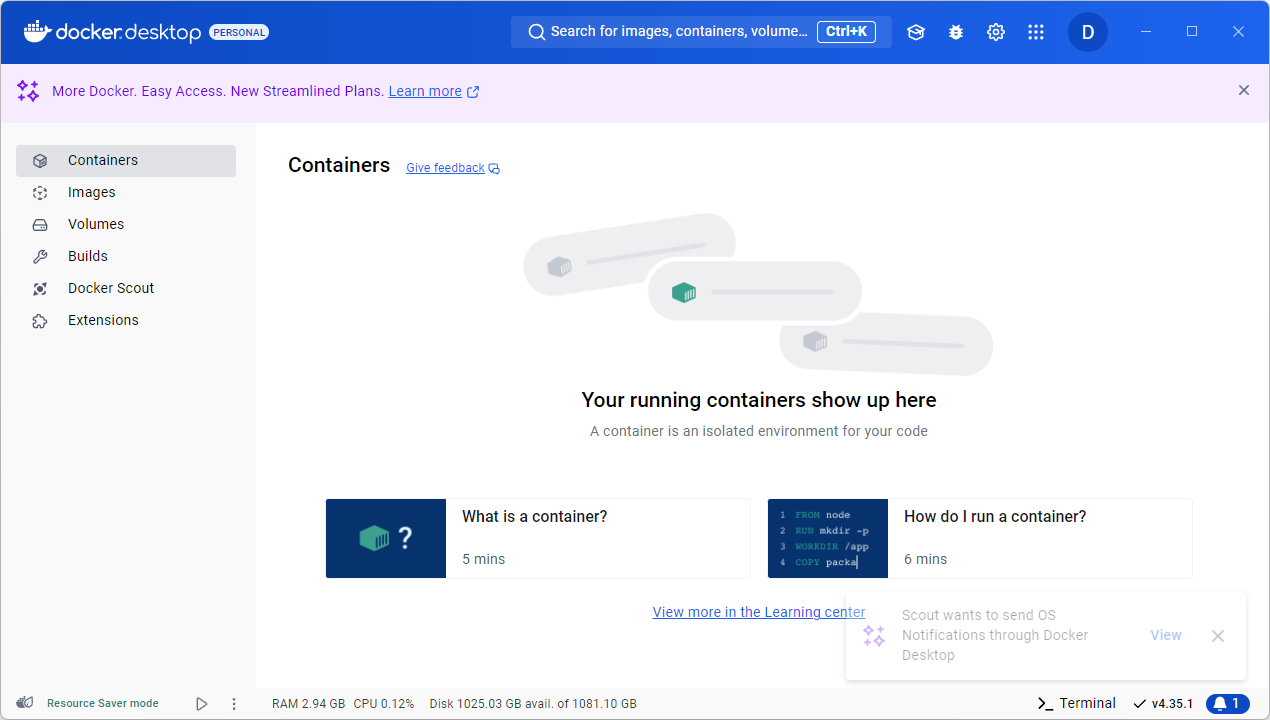
- Containers Tab (Default View):
- This is the main workspace for managing your Docker containers.
- Running Containers: This area will display all active containers. Since this is a fresh installation, there are no running containers yet.
- Learning Center Links: At the bottom, Docker Desktop provides quick links to introductory tutorials, such as “What is a container?” and “How do I run a container?” These short tutorials can help new users understand the basics of containerized applications.
- Sidebar Menu:
- Containers: Takes you back to the main view where you can see all running containers.
- Images: Here, you can view and manage Docker images that you’ve downloaded or built. Images serve as the base for containers.
- Volumes: This section lets you manage volumes, which are used to persist data generated by and used within containers.
- Builds: This tab is for managing builds, particularly if you are working on building Docker images from Dockerfiles.
- Docker Scout: A feature designed to analyze and provide insights on container images, such as vulnerabilities or potential improvements.
- Extensions: Allows you to explore and install extensions to enhance Docker Desktop functionality, such as development and monitoring tools.
- Resource Saver Mode:
- At the bottom left, Docker Desktop shows the current mode, which is Resource Saver Mode in this case. This feature reduces CPU and memory usage when there are no running containers, helping to conserve system resources.
- Scout Notifications:
- A notification appears at the bottom right, indicating that Docker Scout wants to send OS notifications. Docker Scout helps you manage image vulnerabilities and provides insights into best practices.
- System Resource Display:
- At the bottom, Docker Desktop displays real-time usage stats, including RAM, CPU, and Disk utilization. This helps users keep track of the resources Docker is consuming.
This interface provides a user-friendly way to manage Docker’s core components (containers, images, volumes) and includes learning resources for beginners to get started with Docker. From here, users can proceed to pull images, create containers, or explore Docker Desktop’s features.
Step 2: Configuring Docker Desktop Resources
In Docker Desktop’s Settings > Resources section, you can manage key configurations that impact Docker’s performance, especially when using WSL 2 on Windows. Here’s a detailed breakdown of the options you’ll see:
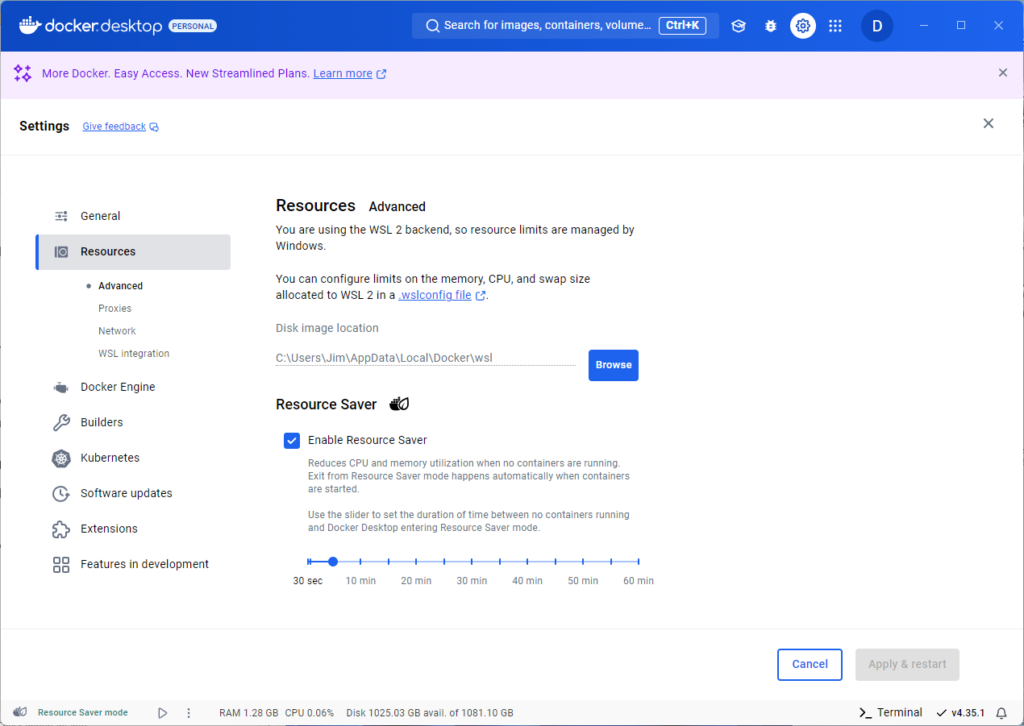
1. WSL 2 Backend and Resource Management
Since Docker Desktop uses WSL 2 as the backend, it relies on Windows to manage resource limits like memory and CPU. You can control these limits by creating a .wslconfig file, which applies to all WSL 2 instances on your system.
Creating and Configuring the .wslconfig File
The .wslconfig file is typically located in C:\Users\<YourUsername>\.wslconfig. This file allows you to set global resource limits for WSL, affecting Docker Desktop when running on WSL 2. Here’s a sample configuration:
[wsl2]
memory=8GB  # Limits memory usage to 8 GB
processors=4  # Limits Docker to 4 CPU cores
swap=4GB  # Sets swap space to 4 GB
After creating or modifying the .wslconfig file, run wsl --shutdown in PowerShell or Command Prompt to apply the changes.
Microsoft Documentation for .wslconfig
For more details on .wslconfig options, refer to the official Microsoft documentation: WSL Configuration.
Example .wslconfig File
Here’s is my .wslconfig file:
[wsl2]
memory=64GB  # Restricts memory usage to 64 GB
processors=6  # Sets the number of virtual processors
swap=20GB  # Configures 20 GB of swap space
swapfile=E:\\temp\\wsl-swap.vhdx  # Custom swapfile location
localhostforwarding=true  # Enables connection between WSL and Windows localhost
This file gives you fine-grained control over how much system memory and CPU Docker (through WSL) can use, which is helpful for optimizing resource allocation especially if you are going to use any LLM above 11B.
Llama 3.2 Vision 90B requires at least 64GB of RAM to run, but 11B can run with much more modest settings.
2. Disk Image Location
Docker Desktop stores its WSL 2 disk images in the specified path, such as
C:\Users\Jim\AppData\Local\Docker\wslThis location contains data related to containers, images, and volumes.

Change this path, move Docker’s storage to a different drive with plenty of space, very soon you’re going to be running low if you do not.
Steps to Change Docker Disk Image Location in Docker Desktop
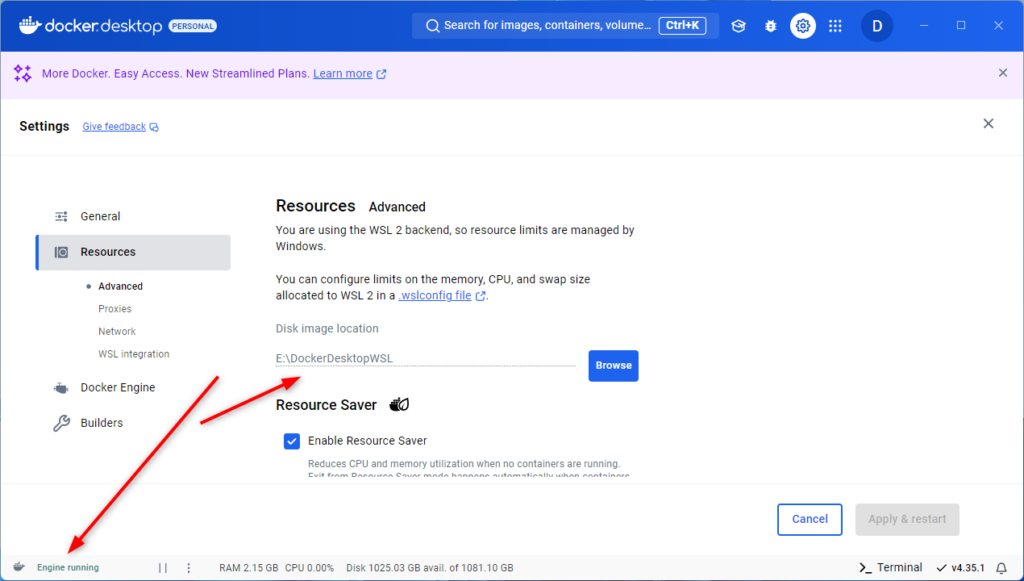
- Disable WSL Integration Temporarily:
- Open Docker Desktop and go to Settings.
- Navigate to Resources > WSL Integration.
- Disable integration with your default WSL distro and any additional distros (e.g., Ubuntu-24.04).
- Restart Docker Desktop:
- Close Docker Desktop and reopen it to ensure the WSL integration changes take effect.
- Change Disk Image Location:
- Go to Settings > Resources > Advanced.
- Under Disk image location, select your desired folder (e.g.,
E:\DockerDesktopWSL). - Apply the changes and restart Docker Desktop.
By temporarily disabling WSL integration, Docker can safely change the disk location without conflicts. Once the new disk image location is set, re-enabling WSL integration allows Docker to operate with the updated storage path.
3. Resource Saver Mode
Docker Desktop includes a Resource Saver feature to minimize CPU and memory usage when there are no running containers. Here’s how it works:
- Automatic Exit from Resource Saver: Docker automatically exits Resource Saver mode as soon as a container starts, allowing Docker to use full resources.
- Adjustable Timer: You can use the slider to set a delay (from 30 seconds up to 60 minutes) before Docker enters Resource Saver mode after all containers stop.
Resource Saver Mode is useful for reducing Docker’s resource impact on your system when it’s not actively running containers.
Step 3: Configuring WSL Integration in Docker Desktop
To ensure that Docker Desktop integrates properly with WSL (Windows Subsystem for Linux), you need to enable WSL integration. This allows Docker to run Linux-based containers within the WSL environment, making it a seamless experience on your Windows machine.
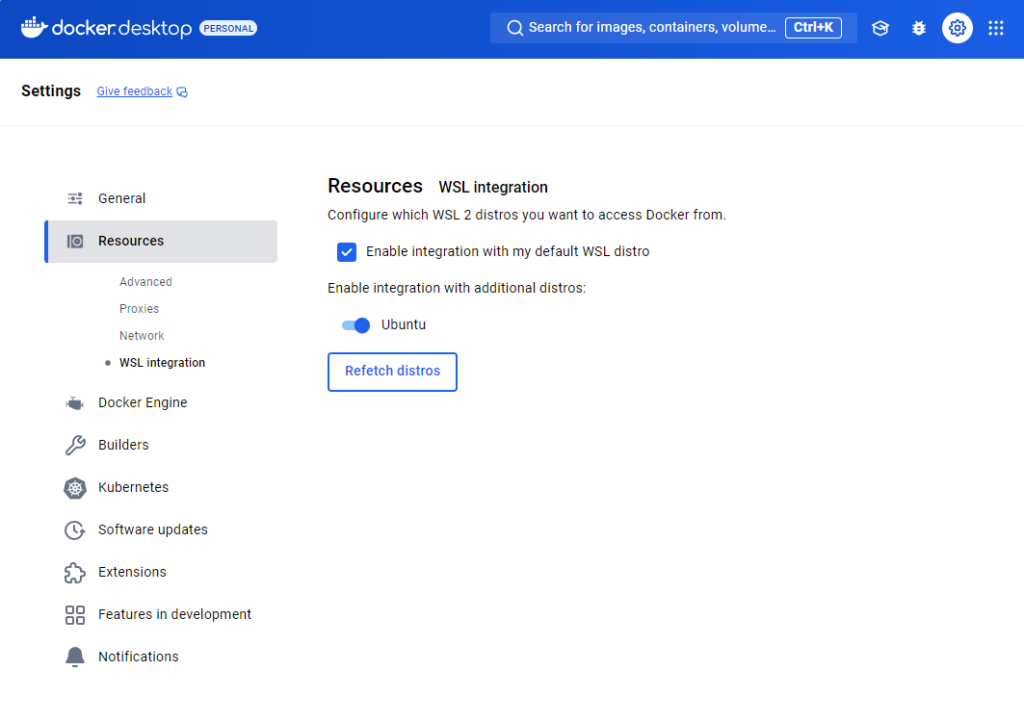
Steps to Enable WSL Integration:
- Open Docker Desktop Settings:
- Click on the gear icon in Docker Desktop to access Settings.
- Navigate to Resources > WSL Integration:
- In the Settings menu, go to Resources on the left sidebar and then select WSL Integration.
- Enable Integration with Default WSL Distro:
- Check the box labeled Enable integration with my default WSL distro. This setting ensures Docker will integrate with your default WSL Linux distribution (e.g., Ubuntu).
- Enable Additional WSL Distributions (If Needed):
- Below the default setting, you’ll see a list of any additional WSL distributions installed on your system. Toggle the switch for each distribution you want Docker to integrate with. For example, if you’re using Ubuntu, ensure the Ubuntu option is enabled.
- Refetch Distros:
- If you recently installed a new WSL distribution or don’t see your distribution listed, click the Refetch distros button. This refreshes the list of available WSL distributions for Docker to integrate with.
- Confirm and Apply:
- After enabling integration for your preferred WSL distributions, click Apply & Restart if prompted to ensure changes take effect.
By configuring WSL integration, Docker Desktop will run smoothly with WSL, allowing you to use Linux containers directly within your chosen WSL distributions. This setup is ideal for development environments where Linux-based containers are required.
Step 4: Configuring and Using the Docker Terminal
After logging into Docker Desktop and finalizing any initial setup steps, the user can access the Settings panel to enable and customize the Docker terminal. This will allow them to run Docker commands directly from the Docker Desktop interface.
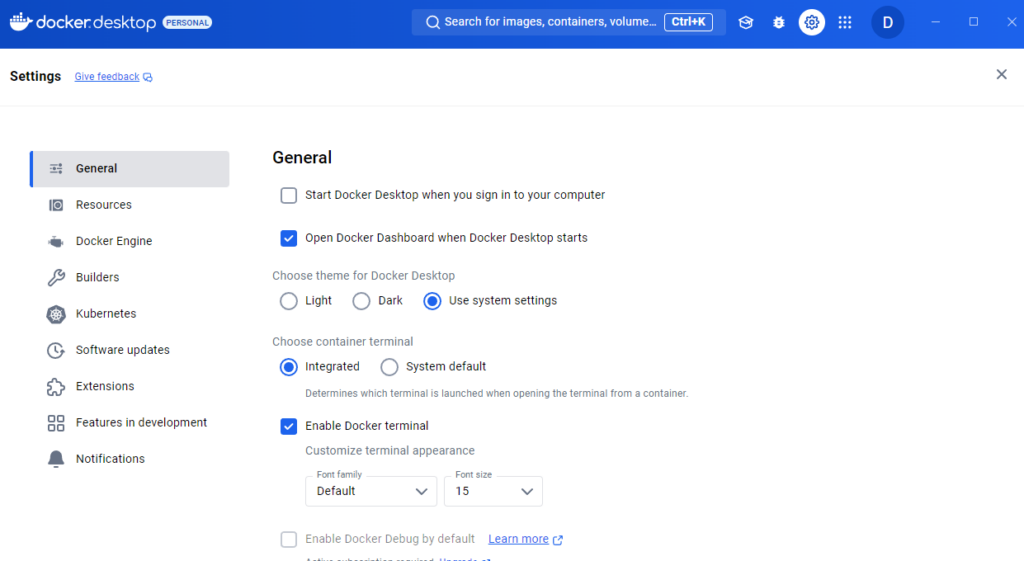
Steps to Enable and Customize Docker Terminal
- Navigate to Settings:
- Click on the gear icon at the top-right corner of Docker Desktop to open the Settings.
- Access General Settings:
- In the Settings sidebar, select General to view the general configuration options (as shown in the screenshot provided).
- Enable Docker Terminal:
- Under the General settings, locate the Enable Docker Terminal option and make sure it’s checked. This option allows Docker Desktop to launch a terminal from the Docker GUI itself, enabling users to execute Docker commands conveniently without opening a separate terminal window.
- Customize Appearance (Optional):
- In the same General settings area, users can customize the terminal’s appearance by selecting the font family and font size to make the interface more comfortable and accessible.
- Confirm and Apply Settings:
- Once changes are made, click Apply & Restart if prompted, ensuring that the settings take effect.
Locating and Using the Terminal
With the Docker terminal enabled, users can find it in the main Docker Desktop interface. This terminal provides a quick and efficient way to run Docker commands directly within Docker Desktop, making tasks such as pulling images, starting/stopping containers, and running scripts more accessible.
Step 5: Restart Docker Desktop to Apply Changes
Now that you’ve completed the Docker Desktop installation and configured WSL integration, it’s recommended to restart Docker Desktop. This will ensure that all settings, especially the WSL integration, are fully applied.
How to Restart Docker Desktop:
- Close Docker Desktop:
- Right-click on the Docker icon in the system tray (usually located in the bottom-right corner of your screen) and select Quit Docker Desktop.
- Reopen Docker Desktop:
- Launch Docker Desktop again from your Start menu or desktop shortcut.
This restart will ensure that Docker Desktop recognizes all your settings, including WSL integration. You’re now ready to start using Docker to run containers and manage your portable AI environment on Windows through WSL.
Part 5: NVIDIA CUDA Support Installation
To configure GPU support for Docker containers, you’ll need to set up the NVIDIA Container Toolkit within your WSL environment. This setup enables you to leverage CUDA for GPU-accelerated applications, which is beneficial for running large language models and other computationally intensive workloads.
Where to Run These Commands
You can execute the following setup steps using any of the following options:
- Docker Desktop Integrated Terminal: Located in the Terminal tab at the bottom of Docker Desktop, this terminal allows you to run Docker commands directly within the Docker Desktop interface.
- Windows PowerShell: Open PowerShell on Windows for easy access to Docker commands in a Windows environment. PowerShell integrates smoothly with Docker Desktop for managing containers and settings.
- Ubuntu Terminal in WSL: If you prefer a Linux-native environment, open the Ubuntu terminal within WSL. This option allows you to interact with Docker in a more Linux-focused setup, which may be useful if you’re following Linux-based documentation.
Choose your preferred terminal and follow the steps below to configure GPU support with the NVIDIA Container Toolkit.
Step 1: Setting Up NVIDIA Container Toolkit for GPU Support in Docker
1. Add the NVIDIA Container Toolkit Repository
Since Ubuntu 24.04 is a new release, we needed a workaround to install the NVIDIA Container Toolkit.
Manually add the stable NVIDIA repository:
curl -s -L https://nvidia.github.io/libnvidia-container/stable/deb/nvidia-container-toolkit.list | sudo tee /etc/apt/sources.list.d/nvidia-container-toolkit.list2. Update Package List and Install NVIDIA Container Toolkit
Here’s how to properly add the NVIDIA GPG key using the new approach:
Create a Keyring Directory if it doesn’t already exist:
sudo mkdir -p /etc/apt/keyringsDownload the Key Directly to the Keyring Directory:
curl -fsSL https://nvidia.github.io/libnvidia-container/gpgkey | sudo tee /etc/apt/keyrings/nvidia-container-toolkit.gpg > /dev/nullUpdate the Repository Entry to use the keyring: Open the NVIDIA repository list:
sudo nano /etc/apt/sources.list.d/nvidia-container-toolkit.listModify the line to include the keyring path:
deb [signed-by=/etc/apt/keyrings/nvidia-container-toolkit.gpg] https://nvidia.github.io/libnvidia-container/stable/ubuntu22.04/$(ARCH) /Update the Package List and Install:
sudo apt update
sudo apt install -y nvidia-container-toolkit
3. Configure Docker to Use NVIDIA Runtime by Default
To enable Docker to use the NVIDIA runtime:
Open the Docker configuration file:
sudo mkdir -p /etc/docker
sudo nano /etc/docker/daemon.json
Add the following configuration:
{
  "default-runtime": "nvidia",
  "runtimes": {
    "nvidia": {
      "path": "nvidia-container-runtime",
      "runtimeArgs": []
    }
  }
}
Save and Exit: Press Ctrl + O to save, Enter to confirm, and Ctrl + X to exit.
4. Restart Docker:
- Restart Docker via Docker Desktop:
- Do not use
sudo service docker restartas it will result in an error (Unit docker.service not found) when Docker is installed via Docker Desktop. - Instead, restart Docker using the following steps:
- Right-click the Docker Desktop icon in the system tray (usually at the bottom-right of your screen).
- Select Restart from the menu.
- Do not use
This approach ensures that the changes to daemon.json are applied without relying on Linux services.
Step 2: Verifying and Cleaning Up CUDA Docker Images
1. Find and Pull a Compatible CUDA Runtime Image
Since CUDA images are regularly updated, it’s important to select a CUDA Docker image that is compatible with your Ubuntu version. Here’s how to find and pull the appropriate image:
a) Visit the NVIDIA CUDA Docker Hub Page
- Navigate to the NVIDIA CUDA Docker Hub page to view available CUDA images and tags.
b) Identify the Latest Compatible Image
- On the Docker Hub page, you’ll find a list of tags representing different CUDA versions and Ubuntu distributions.
- Look for an image tag that matches both the CUDA version you want and your Ubuntu version (e.g.,
ubuntu24.04).For example, for Ubuntu 24.04, you might see tags like:12.6.2-runtime-ubuntu24.0412.6.2-devel-ubuntu24.0412.6.2-base-ubuntu24.04
c) Choose the Appropriate Image Type
- Runtime Image: Contains the CUDA runtime libraries necessary to run CUDA applications.
- Development Image: Includes additional development tools and libraries for compiling CUDA applications.
- Base Image: A minimal image with only the necessary CUDA toolkit components.
d) Pull the Selected Image
Once you’ve identified the correct image tag, pull the image using the following command format:
docker pull nvidia/cuda:<tag>Example:
docker pull nvidia/cuda:12.6.2-runtime-ubuntu24.04 Replace 12.6.2-runtime-ubuntu24.04 with the tag that matches your needs.
2. Test GPU Access in Docker
After pulling the appropriate CUDA image, verify that Docker can access your GPU
Example:
docker run --rm --gpus all nvidia/cuda:<tag> nvidia-smiAt the time of this writing, the appropriate CUDA image was:
docker run --rm --gpus all nvidia/cuda:12.6.2-runtime-ubuntu24.04 nvidia-smiThis command runs the nvidia-smi tool inside the Docker container, which should display information about your NVIDIA GPU if everything is set up correctly.
3. Clean Up Unwanted Images (Optional)
If you have any unused or outdated CUDA images, you can remove them to free up disk space:
a) List Existing CUDA Images
docker images | grep nvidia/cudab) Remove Specific Images
Identify the IMAGE ID of the images you want to remove and run:
docker rmi <IMAGE_ID>To remove all CUDA images at once:
docker rmi $(docker images nvidia/cuda -q)Note on Keeping Up-to-Date with CUDA Images
- Always Check for the Latest Tags: Since CUDA and Docker images are frequently updated, it’s a good practice to check the NVIDIA CUDA Docker Hub page each time you set up a new environment or need an update.
- Compatibility: Ensure that the CUDA version and Ubuntu version in the image tag match your system’s requirements and any specific needs of the applications you plan to run.
Summary of Section 1
You’ve now set up WSL 2 with Ubuntu 24.04, installed Docker with GPU support, and configured it to use CUDA for accelerated processing. You can use this environment to run GPU-based applications, including AI and ML models, entirely offline and in a portable way.
Section 2: Installing and Running Llama 3.2-Vision Model for Image Recognition in Docker on WSL

Introduction of Section 2
This section builds on Section 1, where we set up WSL, Docker, and optional CUDA support on Windows to create a portable AI environment.
In Section 2, we’ll install and run the Llama 3.2-Vision Model for image recognition within Docker. This setup is suitable for both CPU and GPU users, enabling secure, offline interactions with the model without the need for direct internet access.
We will also test Image recognition using FiLeMaker Pro, accessing both the 11B and 90B versions of Llama 3.2-Vision Model
Prerequisites
- Completion of Section 1: Setting Up WSL, Docker, and Optional CUDA Support on Windows
- Access to Docker running in WSL
- Sufficient system resources: Installing and running models like Llama 3.2-Vision requires ample CPU power, RAM, and disk space. We tested it on an Intel Xeon E5 2689 with 96GB of RAM and an NVIDIA GeForce RTX 4060, though the model can also be run on CPU alone.
Step 1: Set Up Ollama in Docker
Ollama is available as an official Docker image, which simplifies the installation and configuration process. Here’s how to set up Ollama:
Pull the Ollama Docker Image: Open your WSL terminal and pull the Ollama image from Docker Hub: docker pull ollama/ollama
Run the Ollama Container with GPU Support (Optional): If you have GPU support enabled, run the container with GPU access:
docker run -d --gpus all -v ollama:/root/.ollama -p 11434:11434 --name ollama ollama/ollama If you’re running on CPU, use:
docker run -d -v ollama:/root/.ollama -p 11434:11434 --name ollama ollama/ollama-v ollama:/root/.ollama mounts the Ollama configuration and data directory.
-p 11434:11434 maps the port for API access.
--name ollama assigns a name to the container.
Verify Ollama is Running: Use the following command to check if the container is active: docker ps The output should show the Ollama container as running.
Step 2: Pull the Llama 3.2-Vision Model
Ollama’s Llama 3.2-Vision model is optimized for image recognition and reasoning tasks. Here’s how to pull and use it:
Pull the Model: Inside the running Ollama container, pull the Llama 3.2-Vision model:
docker exec -it ollama ollama pull llama3.2-vision This command downloads the 11B version of the Llama 3.2-Vision model, which supports text and image inputs. It may take some time, as the model is large (about 7.9GB).
Test the Model with Image Recognition Requests: Now, you’re ready to send requests to the model for image recognition. Use the following example in WSL or any API client:
curl http://localhost:11434/api/chat -d '{
  "model": "llama3.2-vision",
  "messages": [
    {
      "role": "user",
      "content": "What is in this image?",
      "images": ["<base64-encoded image data>"]
    }
  ]
}'
Replace <base64-encoded image data> with an actual Base64 string of your image. This instructs the model to interpret the image content.
Step 3: Testing in FileMaker

We connected to Ollama’s REST API from FileMaker to test how well it works in a real-world application. Using the Insert from URL command in FileMaker, we were able to submit Base64-encoded images and receive detailed responses.
The original version of the FileMaker file and full credit goes to:
https://blog.greenflux.us/filemaker-image-to-text-with-llama32-vision,
you can download it from:
https://github.com/GreenFluxLLC/FileMaker-Experiments/tree/main/OllamaChat
Performance Findings: When running Ollama inside Docker, the processing time for our test image was approximately 133 seconds, compared to 70 seconds when running Ollama directly on Windows (outside Docker). This difference is likely due to Docker’s resource limitations in WSL. We will address this in future steps by configuring Docker to allocate more resources.
Step 4: Set Up Resource Allocation for Docker
By default, Docker may limit the resources allocated to containers. Here’s how we plan to adjust Docker’s settings to optimize performance:
Adjust Docker’s CPU and RAM Allocation: Docker Desktop users can adjust these settings in the Docker Desktop settings under “Resources.” However, as we’re running Docker in WSL, here’s an alternative approach:
Restart Docker and Ollama Container:
Start Docker as described in Section 1, and run the Ollama container again with the updated settings. This should improve processing speed.
Step 5: Expand to the 90B Model (Optional)
Steps to Download the Llama 3.2-90B Model (Restricted in the EU)
Register for Access with a U.S. Location and VPN (if in Europe):
Visit the Llama Model Download Page.
Use a VPN set to a U.S. location if you’re in the EU or another restricted region.
Enter a U.S. address and your email to complete the registration for Llama 3.2-90B.
Receive the Signed URL via Email:
After registration, Meta will send an email containing a unique, signed URL for downloading the model.
The signed URL is valid for 48 hours and allows up to 5 downloads. You may need to request access again if the link expires.
Ensure Compatibility with Docker Desktop Terminal:
When using the signed URL, avoid pasting it in PowerShell or other terminals, as it may introduce invisible characters that prevent successful downloads. The Docker Desktop integrated terminal works best for this.
Step 5.1: Set Up Llama CLI in Docker Container
Install Python and Pip in your Docker container (if not already installed):
docker exec -it ollama apt update docker exec -it ollama apt install -y python3 python3-pipInstall the Llama CLI within the container using pip:
docker exec -it ollama pip install llama-stack This will install the llama command-line tool, allowing you to download the models directly from Meta.
Step 5.2: List Available Models
To verify the models available for download, you can use the following command to list them within the container:
docker exec -it ollama llama model listThis will show the available Llama models so that you can confirm the exact MODEL_ID needed.
Step 5.3: Download the Model
Using the specific model URL provided, you can initiate the download command within the Docker container. Replace MODEL_ID with the appropriate ID for each model (e.g., llama3.2-vision:90B).
docker exec -it ollama llama model download --source meta --model-id MODEL_IDStep 5.4: Specify the Custom URL for Download
Start the Docker container if it’s not already running:
docker run -d --gpus all -v ollama:/root/.ollama -p 11434:11434 --name ollama ollama/ollamaRun the following command in Docker Desktop’s terminal:
docker exec -it ollama llama model download --source meta --model-id Llama3.2-90B-VisionDuring the download, the Llama CLI will prompt you for a unique custom URL. When this happens, paste the URL provided in your instructions:
https://llama3-2-multimodal.llamameta.net/*?Policy................Make sure to use Docker Desktop’s terminal to avoid character issues.
Verify the Download:
The model will download in segments (e.g., consolidated.00.pth, consolidated.01.pth, etc.). Each download segment can be large, so ensure a stable connection.
After the download completes, verify integrity using the MD5 checksums provided in checklist.chk.
You could run again
docker exec -it ollama llama model download --source meta --model-id Llama3.2-90B-Visionthe command will try to download again, check the files that are already downloaded and verify that everything is ok
Additional Notes:
Pretrained and Fine-Tuned Models: The email provides access to both pretrained weights and fine-tuned “Instruct” weights.
Trust and Safety Models: Additional trust and safety models are included, such as Llama-Guard 3.
Follow Responsible Use Guidelines:
Meta provides guidelines for responsible use. Refer to Meta’s Responsible Use Guide for details on proper deployment practices.
Report Issues: Any bugs, security issues, or policy violations should be reported to Meta through the provided channels, including their GitHub page and contact email.
Once you’ve tested the 11B model, you can try the 90B model.
Adjust FileMaker (or API) Requests for the 90B Model: Update the model parameter in your API requests to specify "model": "llama3.2-vision:90B".
Performance Considerations: The 90B model will require significantly more memory and processing power. Ensure that your system has enough resources before attempting to use this model.
Summary of Section 2
In this part, we installed and ran Ollama with the Llama 3.2-Vision model in Docker, integrated it with FileMaker for practical testing, and analyzed its performance. Our findings indicate that resource configuration is crucial for optimal Docker performance, especially when using demanding AI models. This setup offers a flexible, portable AI environment that runs entirely offline, making it ideal for secure deployments.


