We’ll set up a plain Windows Server 2022 environment with IIS and PowerShell to issue a Let’s Encrypt SSL certificate using the Posh-ACME PowerShell module. This guide will ensure that your environment is ready for certificate issuance and renewal using automated and Secure DNS validation and can be used to setup Windows 10\11 also.
Contents
- Prerequisites
- Step 1: Install PowerShell
- Step 2: Install IIS on Windows Server 2022 or 10\11
- Step 3: Install and Configure Posh-ACME
- Step 4: Configure Let’s Encrypt Staging Server
- Step 5: Generate a Staging(test) Certificate
- Step 6: Switch to Production
- Step 7: Confirm the ACME Server
- Step 8: Generate the Production(real) Certificate
- Step 9: Understand the Files
- Step 10: Install OpenSSL on Windows
- Step 11: Prepare the Certificate for IIS
- Step 12: Create the .pfx File
- Step 13: Import into IIS
- Step 14: Bind the Certificate to Your Site
- Step 15: Test Your Site
- Step 16: Enable HTTPS Redirection
- Step 17: Configure HTTPS Redirection
- Step 18: Test the Redirect
- Step 19: Configure Security Headers
- Step 20: Disable Weak Protocols and Cipher with IIS Crypto
- Step 21: Harden Cipher Suites with IIS Crypto
- Step 22: Enable OCSP Stapling (Optional)
- Step 23: Add CAA Records in DNS
- Step 24: Test Your Configuration
Prerequisites
- Environment Setup:
- Windows Server 2022 or Windows 10\11 with IIS installed.
- PowerShell installed (download from PowerShell).
- OpenSSL installed (download from slproweb.com).
- IIS Crypto installed (download from IIS Crypto ).
- URL Rewrite module:( download from IIS URL Rewrite )
- A domain you own, like <yourdomain.eu>
- DNS access to manage your domain.
- A static IP, SSL certificates are issued to domain names, not directly to IPs. However, your domain’s A record must point to a valid public IP at the time of certificate issuance and validation.
- If your local development setup involves a public IP (e.g., through DDNS), you can set up a domain name pointing to your public IP and use that for certificate issuance, but we are not going to cover this here, to keep things as simple as possible.
- Create the DNS A Record
This step ensures your domain points to your server, which is a mandatory requirement for issuing an SSL certificate.
0.1 Determine Your Public IP Address
Open a browser and visit a service like WhatIsMyIP or IPChicken to find your server’s public IP address.
Note down your public IP.
0.2 Login to Your DNS Provider
Access the DNS management console of your domain registrar or DNS provider.
Locate the section for managing records.
0.3 Create the DNS Records
A Record for Root Domain (@)
Host: Enter@(represents the root domain, e.g.,yourdomain.eu).
Type: SelectA(A Record).
Value: Enter your public IP address.
TTL: Set to the default value (e.g., 3600 seconds).
CNAME Record forwwwSubdomain
Host: Enterwww(represents thewwwsubdomain, e.g.,www.yourdomain.eu).
Type: SelectCNAME.
Value: Enteryourdomain.eu.
TTL: Set to the default value (e.g., 3600 seconds).
Example DNS Configuration:Host | Type | Value | TTL
@ | A | 203.x.1x3.2xx | 3600
www | CNAME | yourdomain.eu | 3600
0.4 Verify the DNS Records
Use a DNS lookup tool like DNSChecker or PowerShell’snslookupcommand to verify the records: - nslookup yourdomain.eu
- nslookup www.yourdomain.eu
Ensure the responses match your public IP foryourdomain.euand correctly pointwww.yourdomain.eutoyourdomain.eu.
Important: DNS changes may take up to 48 hours to propagate, but they usually update within minutes.
- Posh-ACME Module:
- We are going to use Posh-ACME to issue a Let’s Encrypt SSL, Certbot discontinued Windows support in February 2024
- Valid Contact Email Address:
- An email like <email>@yourdomain.eu that will be associated with the Let’s Encrypt ACME account for certificate expiration notifications.
Step 1: Install PowerShell
To ensure compatibility and access to the latest features, it’s important to install and verify the correct version of PowerShell. Follow these steps:
Install the Latest Version of PowerShell:
Download and install the latest PowerShell.
Download the installer suitable for your operating system (e.g., Windows, macOS, Linux).
Run the installer and follow the on-screen instructions to complete the installation.
Verify the Installed PowerShell Version:
Open PowerShell with administrative privileges, make sure that you opened the latest version 7.xx and higher that you just installed, not the one that comes installed with Windows.
Execute the following command to check the installed PowerShell version:
pwsh -v This command will display the version number of PowerShell. Ensure it is version 7.0 or higher for optimal compatibility.
Set the Execution Policy to Allow Script Execution:
PowerShell’s execution policy determines which scripts are permitted to run on your system. To allow the execution of local scripts while maintaining security, set the execution policy to RemoteSigned for the current user:
Open PowerShell with administrative privileges, make sure that you opened the latest version 7.xx and higher that you just installed, not the one that comes installed with Windows.
Run the following command:
Set-ExecutionPolicy RemoteSigned -Scope CurrentUserWhen prompted, confirm the change by typing Y and pressing Enter.
Setting the execution policy to RemoteSigned allows scripts created locally to run without a digital signature, while scripts downloaded from the internet require a trusted signature. This balance enhances security without hindering local script development.
Note: Adjusting the execution policy affects script execution behavior. For more details on execution policies and their implications, refer to the official Microsoft documentation: about_Execution_Policies
Step 2.1 : Install IIS on Windows Server 2022
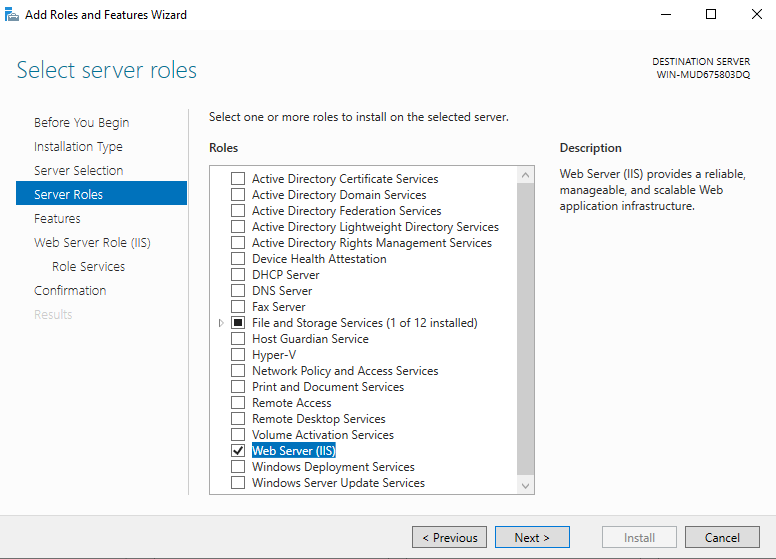
To install Internet Information Services (IIS) on Windows Server 2022, follow these steps:
- Open Server Manager:
- Click on the Start menu.
- Type Server Manager and press Enter to launch it.
- Add Roles and Features:
- In Server Manager, click on Manage in the top-right corner.
- Select Add Roles and Features from the dropdown menu.
- Proceed Through the Wizard:
- On the Before You Begin page, click Next.
- Choose Role-based or feature-based installation and click Next.
- Select your server from the server pool and click Next.
- Select Server Roles:
- In the Select server roles section, check the box for Web Server (IIS).
- A dialog will appear to add required features; click Add Features.
- Click Next to continue.
- Select Features:
- On the Select features page, you can choose additional features if needed. For a basic IIS setup, no extra features are required. Click Next.
- Web Server Role (IIS):
- Review the information on the Web Server Role (IIS) page and click Next.
- Select Role Services:
- In the Select role services section, ensure the following are selected:
- Common HTTP Features: Static Content, HTTP Redirection.
- Application Development: WebSocket Protocol.
- Management Tools: IIS Management Console.
- Click Next to proceed.
- In the Select role services section, ensure the following are selected:
- Confirm Installation Selections:
- Review your selections and click Install.
- Complete the Installation:
- Wait for the installation to finish. Once completed, click Close.
- Verify IIS Installation:
- Open a web browser and navigate to
http://localhost. - You should see the default IIS welcome page, indicating that IIS is installed and running.
- Open a web browser and navigate to
Step 2.2 : Install IIS on Windows 10/11
- Open Control Panel:
PressWindows Key + S, type Control Panel, and select it. - Navigate to Programs and Features:
In Control Panel, click on Programs > Programs and Features. - Access Windows Features:
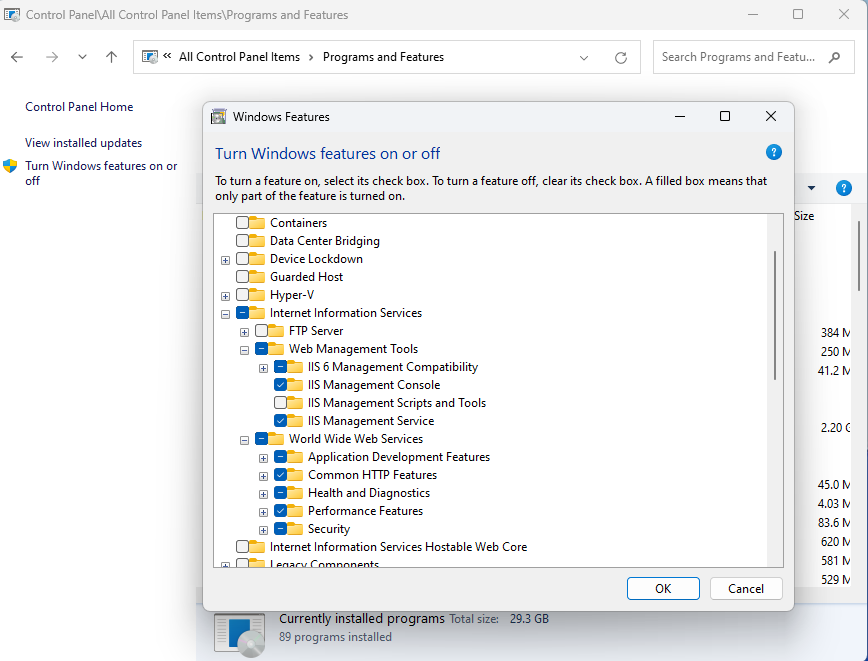
On the left side, click Turn Windows features on or off. - Enable IIS and Required Features:
- Scroll down and find Internet Information Services (IIS).
- Expand the Web Management Tools and World Wide Web Services sections.
- Select the following features:
- Web Server > Common HTTP Features: Enable Static Content and HTTP Redirect.
- Application Development Features: Enable WebSocket Protocol.
- Ensure IIS Management Console is also selected.
- Apply Changes:
Click OK and wait for the installation to complete. - Start IIS:
- Press
Windows Key + R, typeservices.msc, and press Enter. - Locate World Wide Web Publishing Service (W3SVC), right-click it, and select Start.
- Press
Alternative way using PowerShell:
You can streamline the installation process of IIS for every Windows version using one line of PowerShell
Open PowerShell as an Administrator.
Enable IIS and required features:
Enable-WindowsOptionalFeature -Online -FeatureName IIS-WebServerRole, IIS-WebServer, IIS-WebSockets, IIS-HttpRedirect, IIS-StaticContent, IIS-ManagementConsoleStart IIS:
Start-Service W3SVCVerify IIS is running by visiting
http://localhostStep 3: Install and Configure Posh-ACME
Open PowerShell as an administrator and install the module:
Install-Module -Name Posh-ACME -Scope CurrentUser -ForceVerify installation:
Get-Module -ListAvailable Posh-ACMEStep 4: Configure Let’s Encrypt Staging Server
To avoid rate limits during testing, use the Staging Server of Let’s Encrypt, this way you will know that everything works well before you ask to issue the Real production SSL, you will change to production at Step 6:
Set-PAServer LE_STAGEStep 5: Generate a Staging(test) Certificate
Create an ACME account and accept the Terms of Service:
New-PACertificate -Domain <yourdomain.eu>,www.<yourdomain.eu> -AcceptTOS -Contact <email@yourdomain.eu>
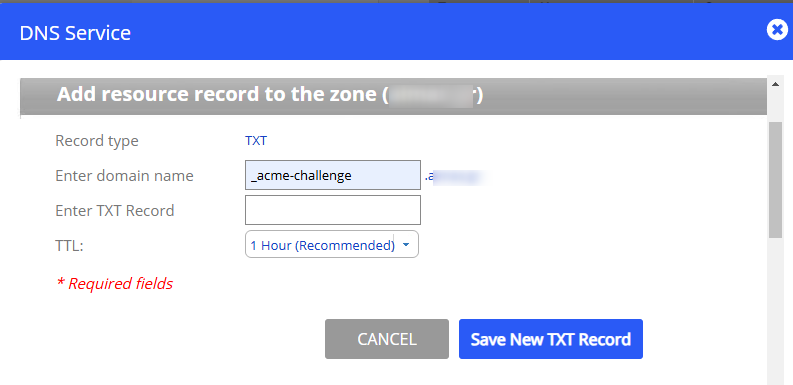
Follow the instructions to create a DNS TXT record for domain validation.
PS C:\Windows\System32> New-PACertificate -Domain <yourdomain.eu>,www.<yourdomain.eu> -AcceptTOS -Contact <email@yourdomain.eu>

Please create the following TXT records: ------------------------------------------

_acme-challenge.<yourdomain.eu> -> cK9yLugh19_kk2u-DGkb4Wvh6sRql1qq7lrjNwAxxxxx
_acme-challenge.www.<yourdomain.eu> -> iGXBQsTpxKxUZVXIx6dEVDoOKyu5gR_JHDwg4xxxx
The message indicates that the ACME protocol used by Let’s Encrypt requires you to prove ownership of the domain yourdomain.eu by creating a DNS TXT records with specific names and values.
Instructions Provided
- TXT Record Name:
_acme-challenge.<yourdomain.eu>
This is the name of the TXT record you need to add to your DNS configuration. - TXT Record Value:
cK9yLugh19_kk2u-DGkb4Wvh6sRql1qq7lrjNwAxxxxx - TXT Record Name for www:
_acme-challenge.www.<yourdomain.eu>
This is the name of the TXT record you need to add to your DNS configuration. - TXT Record Value:
iGXBQsTpxKxUZVXIx6dEVDoOKyu5gR_JHDwg4xxxx
The values of the TXT records, will be different each time you issue an SSL.
Why It’s Needed
This is part of the dns-01 challenge for domain validation:
- Let’s Encrypt asks you to create a TXT record in your domain’s DNS to prove that you own or control the domain.
- The ACME server (e.g., Let’s Encrypt) will query the DNS system to verify that the records exist and matches the expected value.
What to Do
- Log in to Your DNS Management Console:
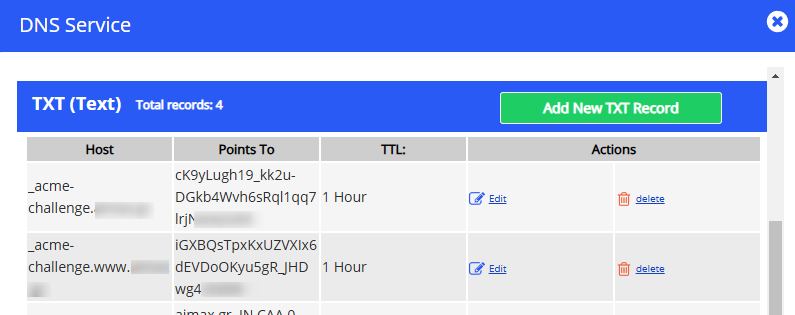
Access the DNS settings for theyourdomain.eudomain, typically provided by your domain registrar or hosting provider. - Add a TXT Record:
- Name:
_acme-challenge
(Some DNS providers automatically append.yourdomain.euto the name, so just_acme-challengemay suffice.) - Type: TXT
- Value:
Q11tHfO0D8J34mD74ctTMZKUEDZpZ5svHXB_ONFtxxx 
- Name:
- Wait for DNS Propagation:
Allow time for the TXT record to propagate across the DNS system. This can take a few minutes to several hours, depending on your DNS provider. - Verify the TXT Record :
- It’s important to highlight that DNS changes can take time to propagate. You should verify that the TXT record is publicly accessible before proceeding.
- Verify the TXT records with a DNS query tool, like
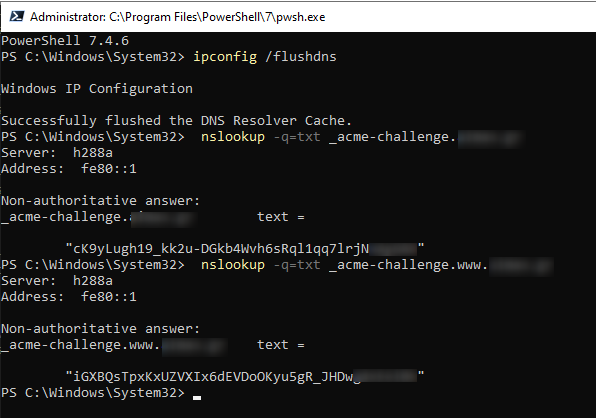
nslookupthat you will check in another PowerShell terminal, DO NOT INTERRUPT THE PROCESS AT THE ORIGINAL TERMINAL: nslookup -q=txt _acme-challenge.<yourdomain.eu>nslookup -q=txt _acme-challenge.www.<yourdomain.eu>
- If the values that you entered at your TXT RECORD is returned, you can proceed with the certificate generation.
- Verify the TXT records with a DNS query tool, like
- It’s important to highlight that DNS changes can take time to propagate. You should verify that the TXT record is publicly accessible before proceeding.
- Continue the Certificate Request :
After adding the TXT records and the TXT records are verified, go back to the terminal whereNew-PACertificateis running and press Enter to continue, Posh-ACME will verify the records and, if successful, generate the certificate.
Troubleshooting Validation
- If the any of the TXT records for
_acme-challenge.yourdomain.euor_acme-challenge.www.yourdomain.euis missing:- Double-check your DNS entry for typos.
- Wait for propagation (up to 1 hour for some DNS providers).
- Clear local DNS cache using:
ipconfig /flushdns
After a while, in the original terminal, Let’s encrypt will create the SSL certificate and return something like:
Please remove the following TXT records:
------------------------------------------
_acme-challenge.<yourdomain.eu> -> cK9yLugh19_kk2u-DGkb4Wvh6sRql1qq7lrjNwAxxxx
_acme-challenge.www.<yourdomain.eu> -> iGXBQsTpxKxUZVXIx6dEVDoOKyu5gR_JHDwgxxxxx
------------------------------------------


Subject     NotAfter              KeyLength Thumbprint                               AllSANs
-------     --------              --------- ----------                               -------
CN=<yourdomain.eu> 2/24/2025 11:37:38 AM 2048      A567A0E51E295A898D1240CB31CC8E2009xxxxx {<yourdomain.eu>, www.<yourdomain.eu>}
Congratulations! You’ve successfully generated a STAGING SSL certificate for <yourdomain.eu> using the Posh-ACME PowerShell module and Let’s Encrypt! 🎉
Cleanup After Validation
After Let’s Encrypt validates the DNS records, you will receive a success message and the certificate will be issued. Example:
Please remove the following TXT records:
------------------------------------------
_acme-challenge.yourdomain.eu
_acme-challenge.www.yourdomain.eu

Remove the TXT records from your DNS settings to keep your configuration clean.
- Confirm removal by running:
nslookup -q=txt _acme-challenge.<yourdomain.eu>nslookup -q=txt _acme-challenge.www.<yourdomain.eu>- You should see a “Non-existent domain” error.
Here’s a summary of what you achieved:
- Installed Posh-ACME:
- Ensured the environment is ready for ACME operations.
- Set the ACME Server to Staging:
- Used
Set-PAServer LE_STAGEto avoid hitting production rate limits during testing.
- Used
- Issued the Certificate:
- Validated the domain by adding the required DNS TXT record.
- Generated the SSL certificate files with details:
- Subject (CN):
yourdomain.eu - Expiration Date:
2/15/2025 - Key Length: 2048-bit
- Thumbprint:
2235563AB1F2FB26A67DA6AE25F72794C364xxx
- Subject (CN):
- Success!
Your Staging SSL files will be at:
C:\Users\<YourUser>\AppData\Local\Posh-ACME\LE_STAGE\<OrderID>\<yourdomain.eu>
Advantages of DNS-01 Challenge
The DNS-01 challenge is a highly secure and flexible way to validate domain ownership because:
- No Open Ports Required:
- Unlike the HTTP-01 challenge, which requires an accessible web server on port 80, the DNS-01 challenge only involves modifying DNS records. This means you don’t need to expose your server to the internet during validation.
- Wildcard Certificates Support:
- It’s the only ACME challenge type that supports issuing wildcard certificates (e.g.,
*.yourdomain.eu). This makes it ideal for securing subdomains without needing to validate each one individually.
- It’s the only ACME challenge type that supports issuing wildcard certificates (e.g.,
- Works Anywhere:
- It doesn’t matter where your website or application is hosted. As long as you have access to manage the DNS for your domain, you can use this method.
- Better for Multi-Server Environments:
- If you’re managing multiple servers or cloud environments, you don’t need to configure validation for each server. You just handle DNS centrally.
- Seamless Automation:
- When combined with DNS APIs (e.g., AWS Route 53, Cloudflare, etc.), the DNS-01 challenge can be fully automated, making certificate issuance and renewal a breeze.
- Enhanced Security:
- By avoiding the need for HTTP/HTTPS traffic during validation, the DNS-01 challenge reduces the attack surface for potential vulnerabilities during the certificate issuance process.
Step 6: Switch to Production
Once everything works in the staging environment, switch to the production server:
Open PowerShell as administrator.
Switch to the production ACME server:
Set-PAServer LE_PROD This ensures all subsequent certificate requests are made to the production Let’s Encrypt server, which issues certificates trusted by browsers.
Step 7: Confirm the ACME Server
Verify that the ACME server is now set to production:
Get-PAServerThe output should indicate the production server:https://acme-v02.api.letsencrypt.org/directory
Step 8: Generate the Production(real) Certificate
Request a new certificate for your domain, ensuring that it’s valid for production:
New-PACertificate -Domain <yourdomain.eu> -AcceptTOS -Contact <email@yourdomain.eu>This process will:
- Validate your domain ownership (using DNS-01 or other challenges).
- Generate the certificate files, including
cert.cer,fullchain.cer, andcert.key.
You will have to repeat the process that you performed to get the staging SSL, to create a new TXT record at your DNS provider.
Great! You have successfully generated the certificate files using Posh-ACME, and they are stored in the directory:
C:\Users\<YourUsername>\AppData\Local\Posh-ACME\LE_PROD\<OrderID>\<yourdomain.eu>Let’s go step-by-step to implement these certificates on IIS while ensuring everything is clear and manageable.
Step 9: Understand the Files
Here’s a breakdown of the files you have in the folder:
cert.cer- The actual SSL certificate for your domain (
yourdomain.eu).
- The actual SSL certificate for your domain (
cert.key- The private key that corresponds to your certificate. This must remain secure and private.
fullchain.cer- Combines your certificate and the intermediate CA (Certificate Authority) chain. This is typically what IIS uses.
chain.cer/chain0.cer- Contains the intermediate CA certificates, used to verify your certificate’s authenticity.
request.csr- The Certificate Signing Request (CSR) file generated during the certificate request.
order.json- Metadata related to your ACME order (for internal use by Posh-ACME).
Step 10: Install OpenSSL on Windows
- Download the Installer:
- Go to the OpenSSL for Windows page.
- Download the version that matches your system architecture:
- Win64 OpenSSL v3.4.x for 64-bit Windows.
- Win32 OpenSSL v3.4.x for 32-bit Windows (rare cases).
- Run the Installer:
- Execute the downloaded installer as an administrator.
- During installation:
- Select the default options unless you have a specific requirement.
- Choose where OpenSSL will be installed (e.g.,
C:\Program Files\OpenSSL-Win64).
- Add OpenSSL to the System Path:
- Open System Properties:
- Press
Windows + R, typesysdm.cpl, and press Enter.
- Press
- Go to the Advanced tab and click Environment Variables.
- Under System Variables, locate the
Pathvariable and click Edit. - Add the OpenSSL
bindirectory (e.g.,C:\Program Files\OpenSSL-Win64\bin) to thePath. - Click OK to save and close.
- Open System Properties:
- Verify Installation:
- Open a new Command Prompt or PowerShell window.
- Type:
openssl version - If installed correctly, you will see the OpenSSL version number.
Step 11: Prepare the Certificate for IIS
IIS requires a .pfx file (PKCS#12 format) that includes the certificate, private key, and chain.
Open PowerShell and navigate to the directory:
cd "C:\Users\<YourUsername>\AppData\Local\Posh-ACME\LE_PROD\<OrderID>\<yourdomain.eu>"Combine the certificate and private key into a .pfx file using OpenSSL:
Step 12: Create the .pfx File
Use the fullchain.cer file to include the intermediate certificate when creating the .pfx:
openssl pkcs12 -export -out <yourdomain>.pfx -inkey cert.key -in fullchain.cer -password pass:YourPfxPasswordReplace YourPfxPassword with a strong password to secure the .pfx file, you are going to need this password later to import the SSL at the IIs Web Server.
<yourdomain>.pfx will be the name of the certificate to import, do not include the domain extension like .eu, .com etc.
Step 13: Import into IIS
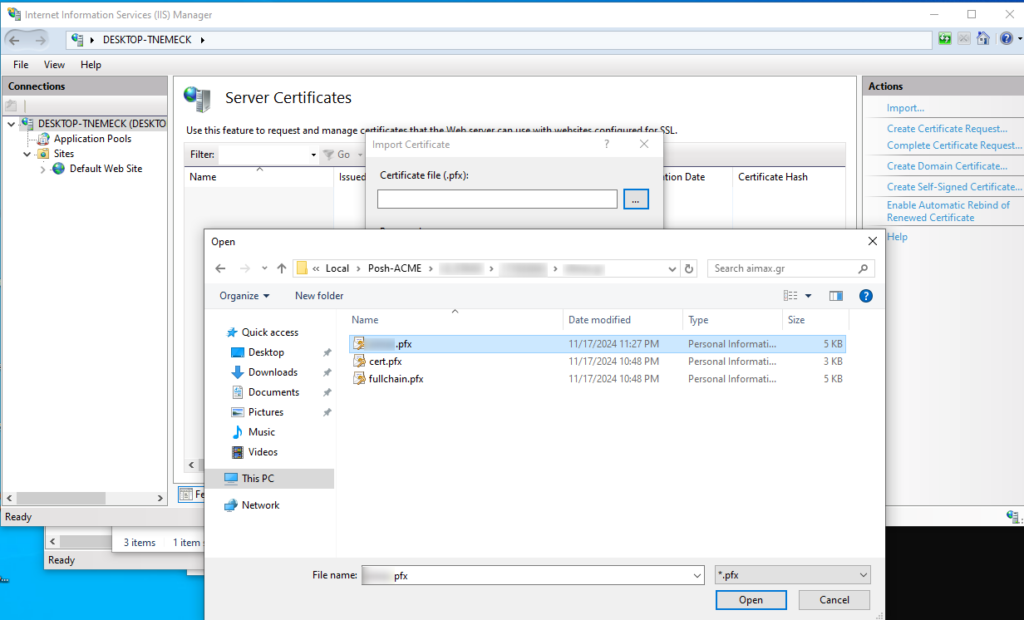
- Open IIS Manager.
- Import the production
.pfxfile:- Go to Server Certificates > Import.
- Select the <yourdomain>.pfx file and enter the password you used as (
YourPfxPassword). - Click OK.
Step 14: Bind the Certificate to Your Site
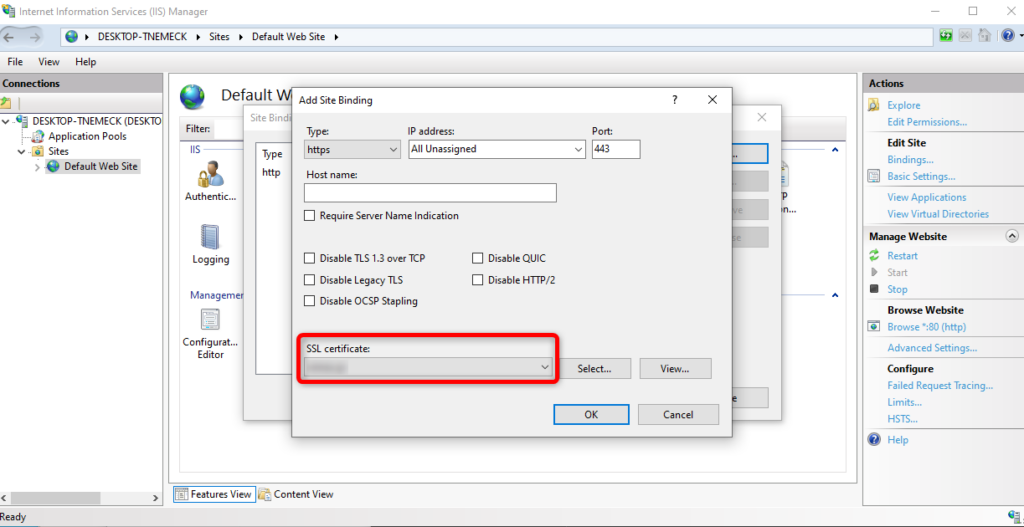
- In IIS Manager, expand the Sites node and select your website (e.g., Default Web Site).
- Click Bindings in the right-hand panel.
- Add HTTPS binding:
- Click Add.
- Choose https as the type.
- Select the imported certificate from the dropdown.
- Click OK.
- Close the Site Bindings dialog.
Step 15: Test Your Site
Open a browser and visit
https://<yourdomain.eu>Check the SSL status (you should see the secure padlock icon).
Verify the certificate using SSL Labs.
Step 16: Enable HTTPS Redirection
16.1 Download and Install the IIS URL Rewrite Module
The IIS URL Rewrite module allows you to create powerful rules for URL redirection and rewriting directly in IIS or the web.config file. It’s essential for setting up conditional redirects, such as redirecting all HTTP traffic to HTTPS.
16.2 Download the Module
- Visit the official Microsoft IIS URL Rewrite module page: Download IIS URL Rewrite
- Click on the Download button to get the installer.
16.3 Install the Module
- Run the downloaded installer.
- Follow the installation wizard steps:
- Accept the license agreement.
- Click Next and complete the installation.
- Restart IIS:
iisreset
16.4 Verify Installation
- Open IIS Manager.
- Select your website.
- Look for URL Rewrite in the Features View. If it’s present, the module is installed successfully.
Step 17: Configure HTTPS Redirection
17.1 Add or Update the web.config File
- Navigate to the root directory of your site (e.g.,
C:\inetpub\wwwroot). - Open the
web.configfile. If it doesn’t exist, create one. - Add the following content to enable HTTPS redirection:
<?xml version="1.0" encoding="UTF-8"?>
<configuration>
    <system.webServer>
        <rewrite>
            <rules>
                <!-- Redirect HTTP to HTTPS -->
                <rule name="Redirect to HTTPS" stopProcessing="true">
                    <match url="(.*)" />
                    <conditions>
                        <!-- Only redirect if the request is NOT already HTTPS -->
                        <add input="{HTTPS}" pattern="off" ignoreCase="true" />
                    </conditions>
                    <action type="Redirect" url="https://{HTTP_HOST}/{R:1}"
                   redirectType="Permanent" />
                </rule>
            </rules>
        </rewrite>
    </system.webServer>
</configuration>
Step 18: Test the Redirect
18.1 Steps to Test
- Open your browser and navigate to:
http://yourdomain.eu→ Should redirect tohttps://yourdomain.eu.https://yourdomain.eu→ Should load directly without any redirection issues.
18.2 Verify the Redirect
- Use a tool like Redirect Checker to confirm the redirect.
- Alternatively, use browser developer tools (F12):
- Go to the Network tab.
- Watch the HTTP request redirect to HTTPS with a 301 Permanent Redirect.
Common Troubleshooting
Issue: Redirect Loops
- Cause: The redirect is applied to HTTPS traffic as well.
- Solution: Ensure the
<conditions>section in theweb.configspecifies{HTTPS} pattern="off".
Issue: Redirection Doesn’t Work
- Cause 1: The
web.configfile is missing or not applied. - Solution: Check the site’s root directory for the
web.configfile and confirm the content matches the example. - Cause 2: URL Rewrite module is not installed.
- Solution: Install the URL Rewrite module as described in Step 1.
Step 19: Configure Security Headers
HSTS ensures browsers only connect to your site over HTTPS, improving security.
- Configure HSTS in IIS:
- Open the HTTP Response Headers feature for your site in IIS.
- Click Add in the Actions pane.
- Add the following header:
- Name:
Strict-Transport-Security - Value:
max-age=31536000; includeSubDomains; preload
- Name:
- Click OK to save.
- Verify HSTS Behavior:
- Add the rest of Security Headers:
- CSP: enhance protection against injection attacks
- Name:
Content-Security-Policy - Value:
default-src 'self'; script-src 'self'; style-src 'self'; img-src 'self'.
- Name:
- X-Content-Type-Options: Prevent MIME sniffing with
nosniff- Name:
X-Content-Type-Options - Value:
nosniff.
- Name:
- X-Frame-Options: Block clickjacking attacks with
DENY- Name:
X-Frame-Options - Value:
DENY.
- Name:
- X-XSS-Protection: to mitigate reflected XSS attacks
- Name:
X-XSS-Protection - Value:
1; mode=block.
- Name:
- CSP: enhance protection against injection attacks
Verify Security Headers:
- Use tools like the Mozilla Observatory or Hardenize to test your HTTP headers.
Step 20: Disable Weak Protocols and Ciphers with IIS Crypto
Download and Run IIS Crypto Tool:
Download the free IIS Crypto tool.
Open the tool and:
Enable Only TLS 1.2 and TLS 1.3:
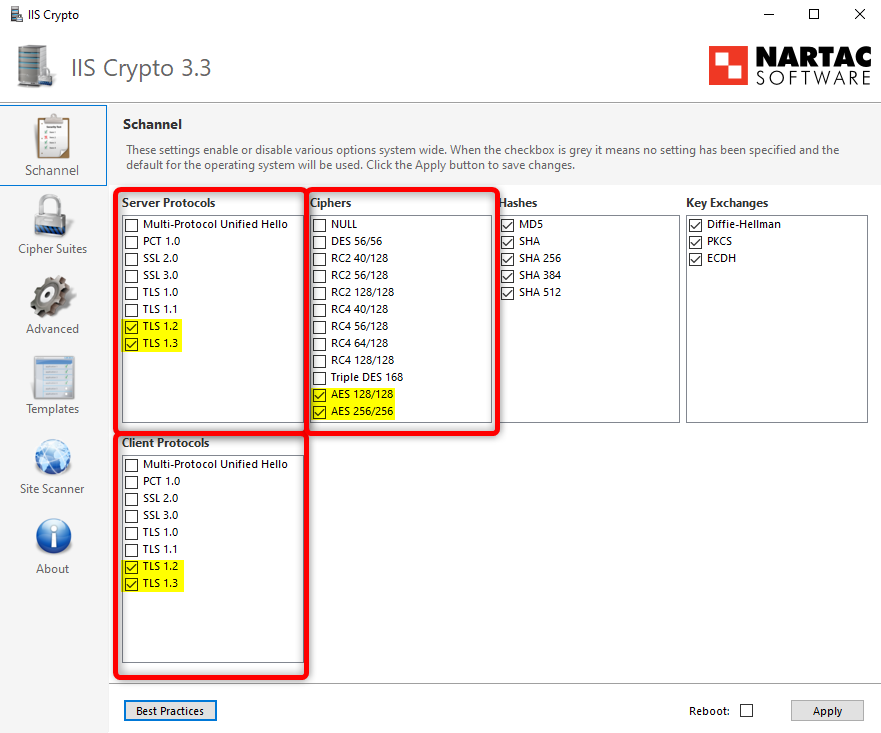
Disable Weak Protocols
In the Schannel tab, there are separate sections for Server Protocols and Client Protocols. Configure both as follows:
Server Protocols:
- Uncheck the following:
- PCT 1.0: Outdated protocol, no longer secure.
- SSL 2.0: Vulnerable to attacks like POODLE.
- SSL 3.0: Also vulnerable to POODLE and other exploits.
- TLS 1.0: Weak encryption, should be disabled.
- TLS 1.1: Deprecated, no longer secure.
- Keep the following checked:
- TLS 1.2: Industry standard for secure communication.
- TLS 1.3: The most secure and modern TLS protocol.
Client Protocols:
- Repeat the same steps as above for the Client Protocols section to ensure both client and server configurations are aligned.
Disable Weak Ciphers:
- Ensure the following ciphers are unchecked:
- NULL
- DES 56/56
- Triple DES 168
- RC2 40/128
- RC2 128/128
- RC4 40/128
- RC4 56/128
- RC4 64/128
- RC4 128/128
Enable Secure Ciphers:
- Check the following:
- AES 128/128
- AES 256/256
Step 21: Harden Cipher Suites with IIS Crypto:
To further strengthen your security, configure Windows Server to prioritize modern and secure cipher suites.
Go to Cipher Suites tab and Disable weak protocols and cipher suites:
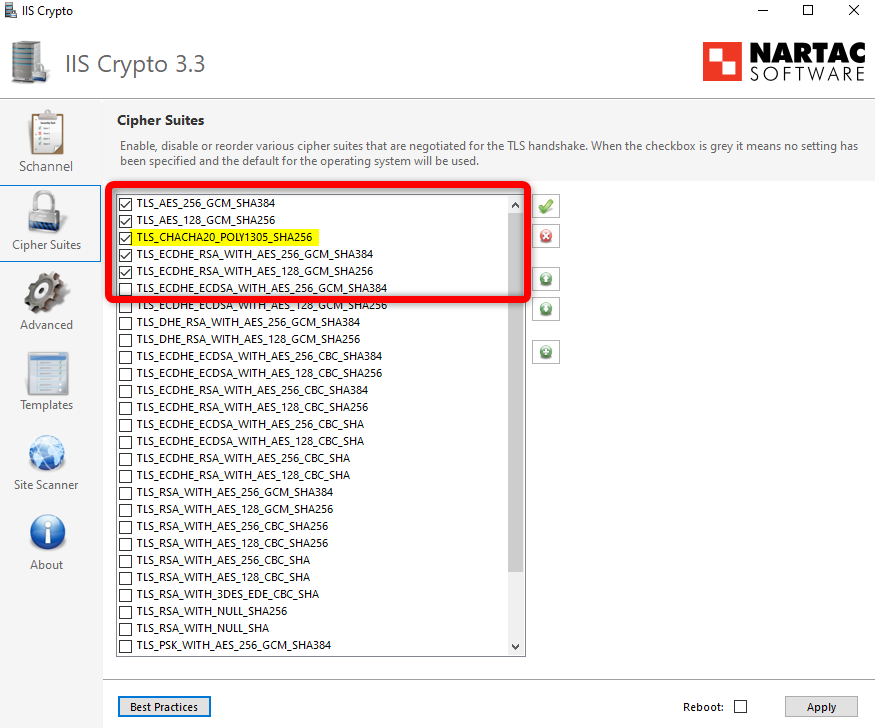
First, DISABLE all Cipher Suites using the red button and then enable only the strong ones (e.g., AES-GCM with 128/256-bit keys), re-arrange them in the following order:
- # TLS 1.3 (suites in server-preferred order)
- TLS_AES_256_GCM_SHA384 (0x1302) ECDH secp384r1 (eq. 7680 bits RSA) FS 256
- TLS_AES_128_GCM_SHA256 (0x1301) ECDH x25519 (eq. 3072 bits RSA) FS 128
- TLS_CHACHA20_POLY1305_SHA256 (0x1303) ECDH secp384r1 (eq. 7680 bits RSA) FS 256
- # TLS 1.2 (suites in server-preferred order)
- TLS_ECDHE_RSA_WITH_AES_256_GCM_SHA384 (0xc030) ECDH secp384r1 (eq. 7680 bits RSA) FS 256
- TLS_ECDHE_RSA_WITH_AES_128_GCM_SHA256 (0xc02f) ECDH x25519 (eq. 3072 bits RSA) FS 128
You can ADD Suites by using the (+) green button if any of these do not exist in the list, for example the TLS_CHACHA20_POLY1305_SHA256
Apply changes and restart.
Manually Adjust Cipher Suites (Optional):
If you prefer manual configuration, adjust the cipher suite order in the registry or via PowerShell:
Set-ItemProperty -Path 'HKLM:\SOFTWARE\Policies\Microsoft\Cryptography\Configuration\SSL\00010002' -Name Functions -Value "TLS_AES_256_GCM_SHA384,TLS_AES_128_GCM_SHA256,TLS_CHACHA20_POLY1305_SHA256"Step 22: Enable OCSP Stapling (Optional)
OCSP stapling improves performance and reduces latency for certificate status checks.
- Enable OCSP Stapling in IIS:
- In IIS Manager, select your site.
- Go to SSL Settings and ensure Require SSL is checked.
- Verify that Disable OCSP Stapling is unchecked in the Site Binding settings.
Step 23: Add CAA Records in DNS:
If your domain does not have a CAA (Certificate Authority Authorization) record, it means you have not explicitly restricted which CAs are allowed to issue certificates for your domain.
Adding CAA records is a best practice to improve security by reducing the risk of unauthorized certificates being issued, read our in depth analysis: No CAA = Open Door for Fraud: Why CAA Records Should Be Mandatory
Add CAA records to your DNS zone file to specify which CAs can issue certificates for your domain. For example:
<yourdomain.eu>. IN CAA 0 issue "letsencrypt.org"
<yourdomain.eu>. IN CAA 0 issuewild "letsencrypt.org"
This ensures only Let’s Encrypt can issue certificates for your domain.
Step 24: Test Your Configuration
Verify the SSL/TLS setup for your site.
- Check HTTPS Functionality:
- Open a browser and visit
https://yourdomain.eu. - Ensure the site loads without errors and displays a secure padlock.
- Open a browser and visit
- Run an SSL Test:
- Use SSL Labs to analyze your site. It will provide a detailed report and security grading.
- Run a Full Test:
- Use https://web-check.xyz/ to get a detailed report for your site
Notes
Ensure DNS propagation delays are accounted for during manual validation.
- Use a secure and encrypted method to store API credentials.
- Automate renewals and deployment to minimize manual intervention.

