Comprehensive Tutorial:
If you wish to test all this in your regular Windows 10/11 Workstation, here is a detailed tutorial on how to setup FileMaker Server (any version) on unsupported Windows 10 or 11: https://axelar.eu/how-to-set-up-a-test-environment-for-claris-filemaker-server-on-windows-10-11/
You can also create a test environment using the suggested Windows Server:
https://axelar.eu/setting-up-a-45-day-free-trial-environment-for-claris-filemaker-server-the-proper-way/
If you want to learn how to install PowerShell you can start here: https://axelar.eu/exploring-powershell-core-the-cross-platform-automation-tool/
Step 1: Install FileMaker Server 21
Run the FileMaker Server Installation Wizard:
Launch the FileMaker Server installer and follow the prompts to complete the installation.
Enable Web Publishing:
Open the FileMaker Server Admin Console.
http://127.0.0.1:16001/admin-console/app/connectors/webpublishing
and Enable the Web Publishing Engine,
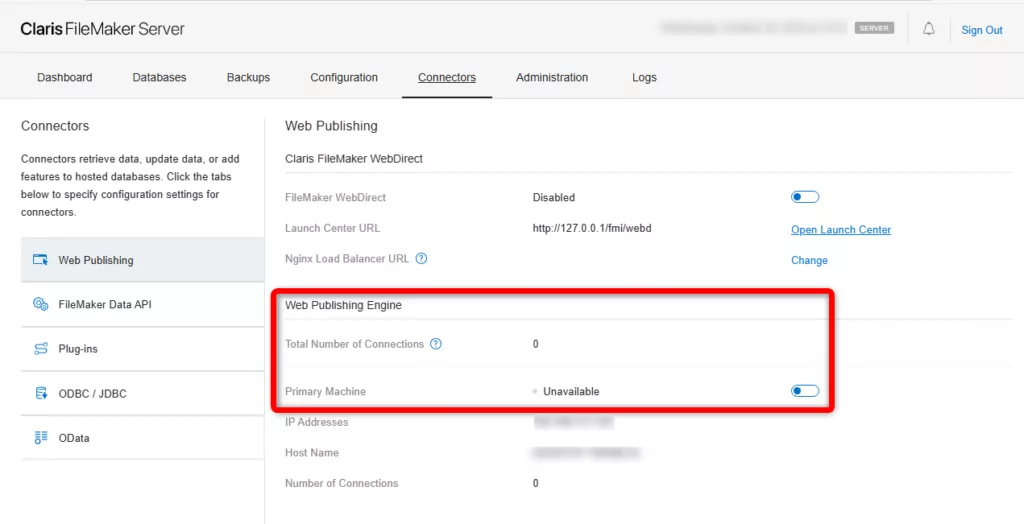
A wizard will ask you to install Java
Download the Required Java JDK:
https://adoptium.net/temurin/releases/?variant=openjdk17
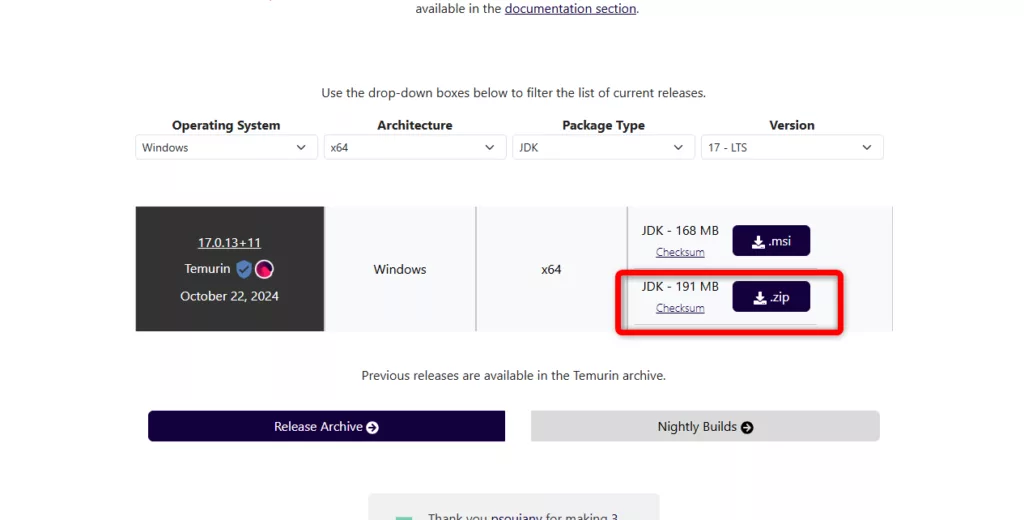
Download the required JDK as a .zip file.
Note: There’s no need to extract the zip file. The FileMaker Server installer will automatically consume the zip file during setup.
Restart the server
Stop the server
net stop "FileMaker Server"
The FileMaker Server service is stopping………..
The FileMaker Server service was stopped successfully.
Start the Server
net start "FileMaker Server"The FileMaker Server service is starting.
The FileMaker Server service was started successfully.
Go to Connectors and enable the Web Publishing Machine.
In Admin Console, make sure the Web Publishing Engine is enabled on the primary machine
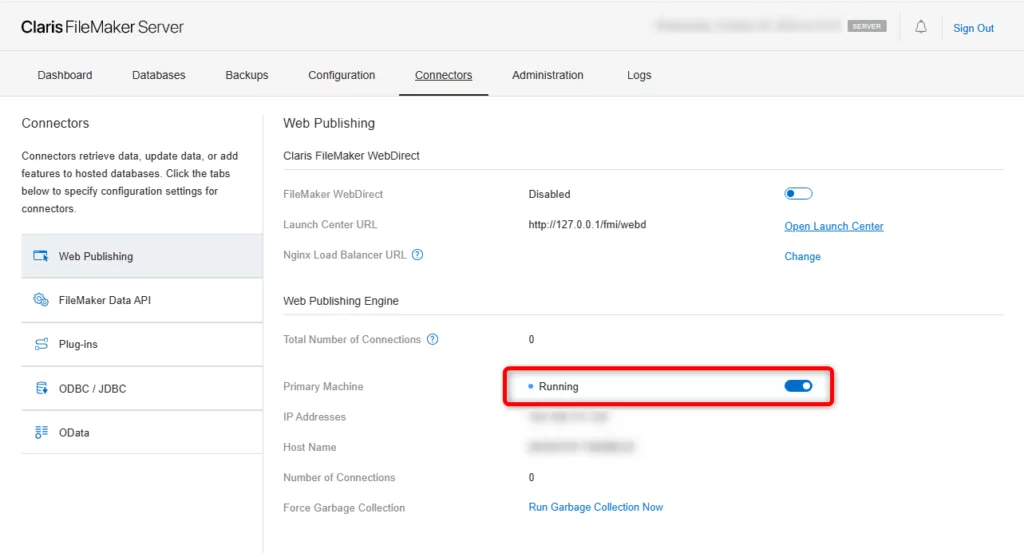
Confirm Web Document Directory:
The web documents directory for FileMaker Server is located at:
C:\Program Files\FileMaker\FileMaker Server\HTTPServer\conf\Step 2: Check the environment variables after FileMaker Server and Java installation
In Windows, you can open the Environment Variables settings directly from PowerShell by using the following command:
rundll32 sysdm.cpl,EditEnvironmentVariables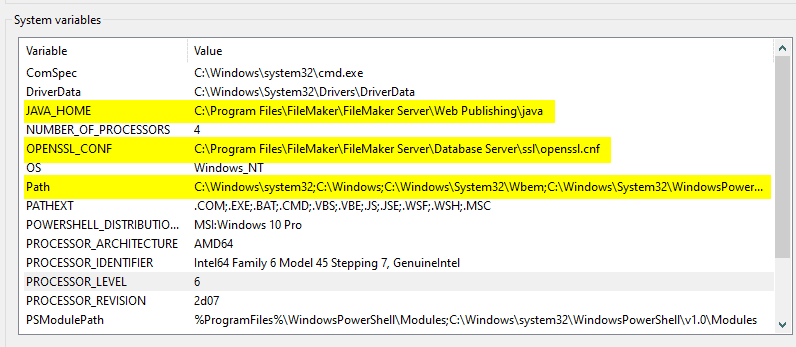
You should see the following:
JAVA_HOME:
C:\Program Files\FileMaker\FileMaker Server\Web Publishing\javaOPENSSL_CONF:
C:\Program Files\FileMaker\FileMaker Server\Database Server\ssl\openssl.cnfDouble clicking on Path you should see the following:
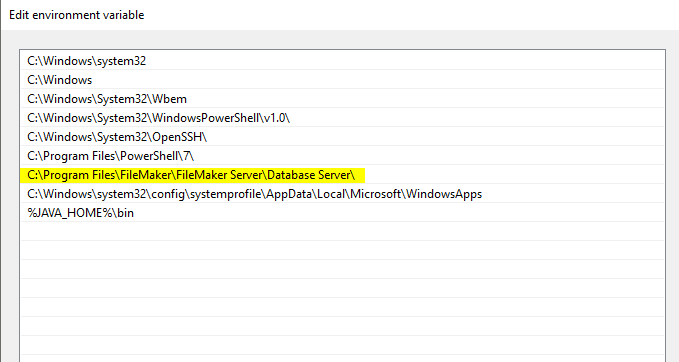
C:\Program Files\FileMaker\FileMaker Server\Database Server\If you don’t you can fix this later in this tutorial.
Stop the FileMaker Server to prevent conflicts during the PHP setup
net stop "FileMaker Server"Step 3: Install PHP 8.x.x
Download PHP:
Download the latest PHP 8.x.x Thread-Safe ZIP package for Windows from the PHP website.
Extract the zip file contents into a new directory, name it php, and after extraction, Copy the php folder.
Go to C:\Program Files\FileMaker\FileMaker Server\Web Publishing\publishing-engine\ and Paste the php folder.
Your new PHP installation will be in:
C:\Program Files\FileMaker\FileMaker Server\Web Publishing\publishing-engine\phpStep 4: Configure System Environment Variables
To ensure FileMaker Server and PHP can work together, set the necessary system environment variables.
System PATH Variables:
Open System Properties > Environment Variables or use PowerShell
rundll32 sysdm.cpl,EditEnvironmentVariablesand check if the following variables exist. If not, add them:
JAVA_HOME:
C:\Program Files\FileMaker\FileMaker Server\Web Publishing\javaOPENSSL_CONF:
C:\Program Files\FileMaker\FileMaker Server\Database Server\ssl\openssl.cnf
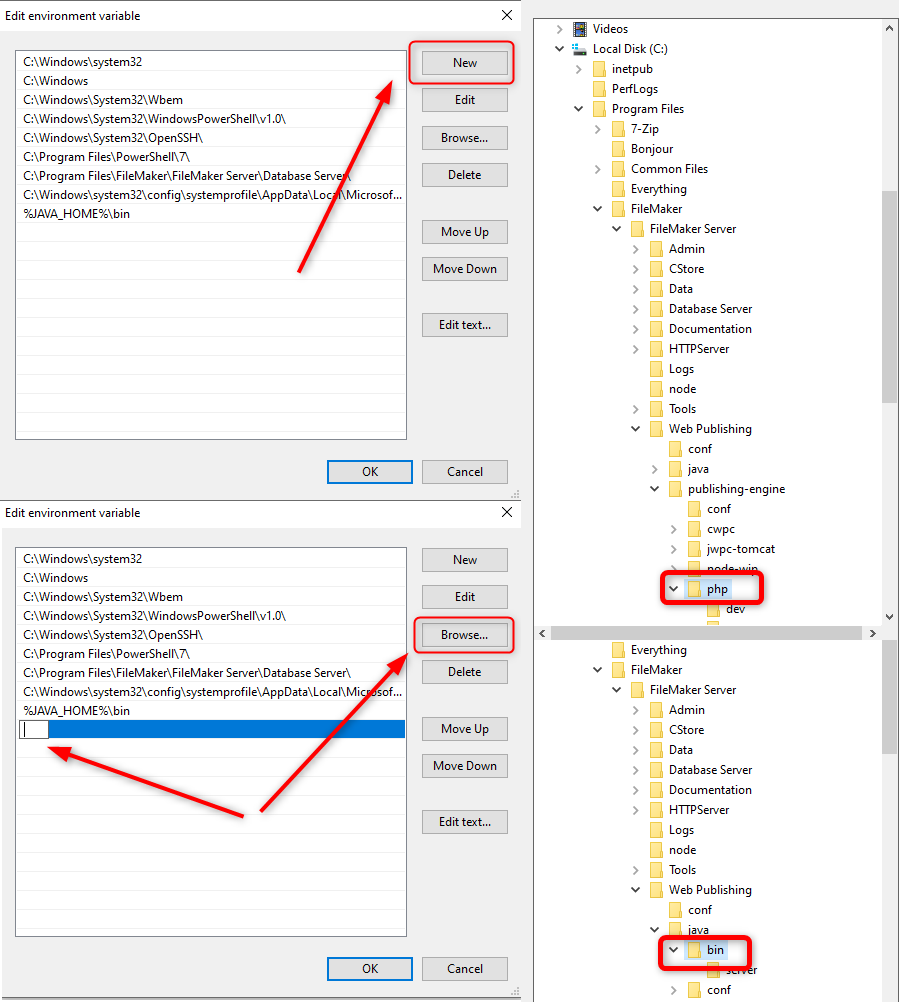
Path: Add these paths to the system Path variable:
C:\Program Files\FileMaker\FileMaker Server\Web Publishing\publishing-engine\php;
C:\Program Files\FileMaker\FileMaker Server\Web Publishing\java\bin;
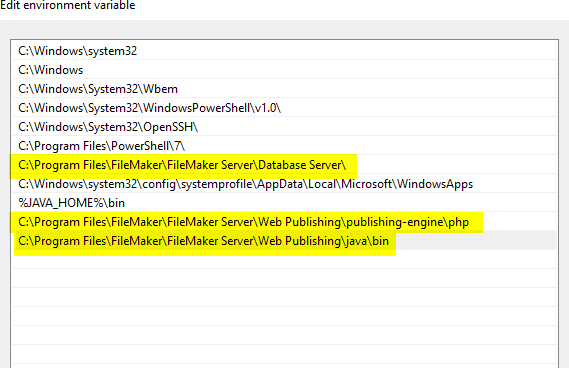
You should have these environment variables in your System Path:

Optional PowerShell Script to Add Environment Variables* : Use this PowerShell script to automate the addition of these variables:
# Define paths
$javaHome = "C:\Program Files\FileMaker\FileMaker Server\Web Publishing\java"
$opensslConf = "C:\Program Files\FileMaker\FileMaker Server\Database Server\ssl\openssl.cnf"
$phpPath = "C:\Program Files\FileMaker\FileMaker Server\Web Publishing\publishing-engine\php"
$databaseServerPath = "C:\Program Files\FileMaker\FileMaker Server\Database Server\"

# Set JAVA_HOME if not set
if (-not (Test-Path -Path Env:JAVA_HOME)) {
    [System.Environment]::SetEnvironmentVariable("JAVA_HOME", $javaHome, [System.EnvironmentVariableTarget]::Machine)
}

# Set OPENSSL_CONF if not set
if (-not (Test-Path -Path Env:OPENSSL_CONF)) {
    [System.Environment]::SetEnvironmentVariable("OPENSSL_CONF", $opensslConf, [System.EnvironmentVariableTarget]::Machine)
}

# Update PATH if paths are not already added
$currentPath = [System.Environment]::GetEnvironmentVariable("Path", [System.EnvironmentVariableTarget]::Machine)
if ($currentPath -notlike "*$phpPath*") {
    [System.Environment]::SetEnvironmentVariable("Path", "$currentPath;$phpPath;$databaseServerPath;$javaHome\bin", [System.EnvironmentVariableTarget]::Machine)
}
*Note: you need to press Enter for the script to fully execute.
Restart the Server to apply the environment variable changes.
Stop the server
net stop "FileMaker Server"Start the server
net start "FileMaker Server"Now we can check if PHP and Java are installed in our system and running.
Open PowerShell and type:
php -v
PHP is running and we have access system wide, to check Java type:
java --version
Step 5: Edit php.ini:
In the PHP directory, rename php.ini-development to php.ini, and open it for editing.
Add the following lines for required FileMaker and cURL configuration:

; Trusted root certificate location for secure connections
curl.cainfo = "C:\Program Files\FileMaker\FileMaker Server\CStore\root.pem"
; Include path for FileMaker libraries
include_path = ".;C:\Program Files\FileMaker\FileMaker Server\Web Publishing\publishing-engine\php"
; Extension directory
extension_dir = "C:\Program Files\FileMaker\FileMaker Server\Web Publishing\publishing-engine\php\ext\"
[PHP_CURL]
extension=php_curl.dllYou can download a fresh copy of php.ini from here
Step 6: Download and Set Up the AirMoi FileMaker PHP API:
Go to AirMoi PHP FileMaker API and download the zip file.
Unzip it, and copy the these Files and the src Folder
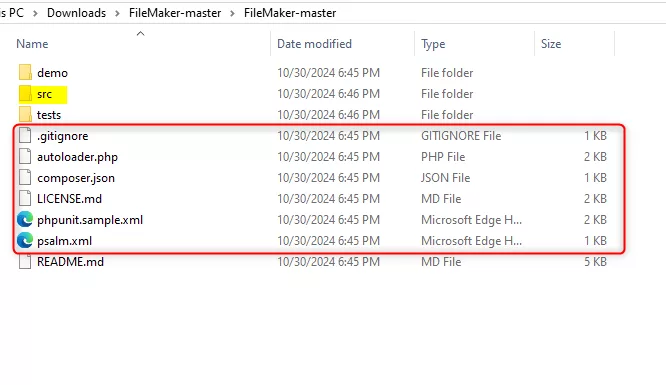
directly into the PHP directory:
C:\Program Files\FileMaker\FileMaker Server\Web Publishing\publishing-engine\php
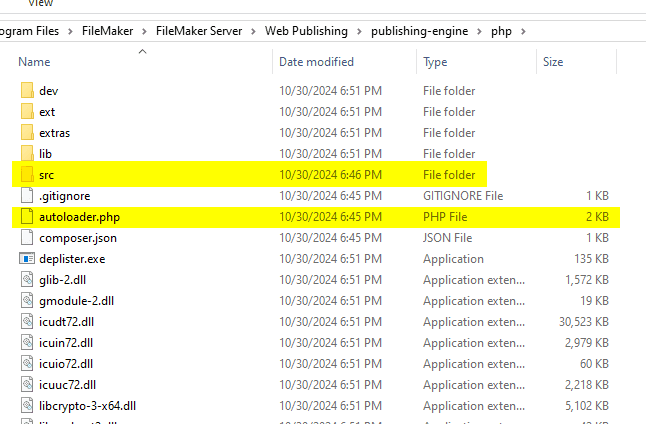
You can download a fresh copy of the PHP folder with the AirMoi PHP API and the configurated php.ini from here
Step 7: Configure FastCGI in IIS
Open IIS Manager:
Go to Start > Administrative Tools > Internet Information Services (IIS) Manager.
Add a Handler Mapping for PHP:
In IIS Manager, select your server in the left pane.
Double-click Handler Mappings in the middle pane.
On the right side, click Add Module Mapping….
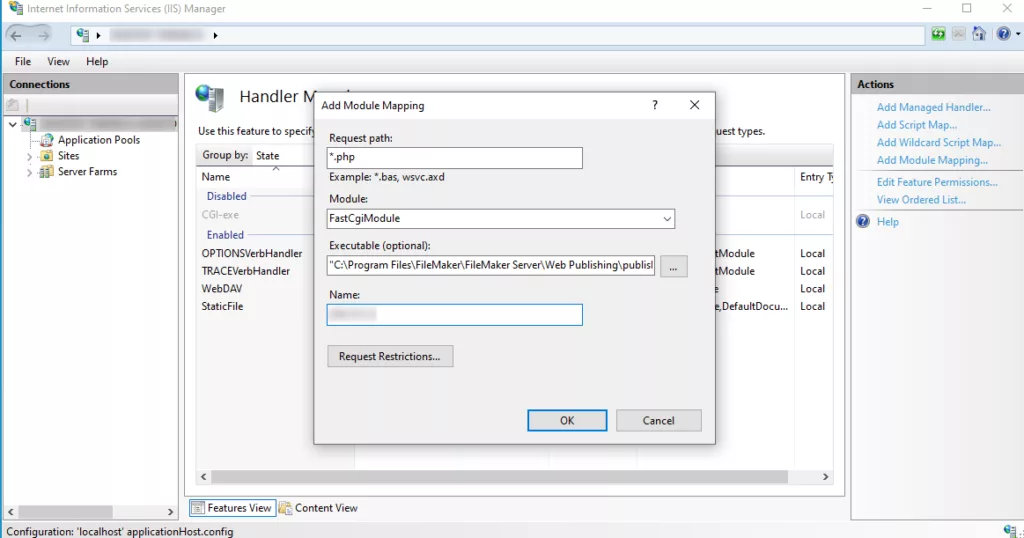
Configure the Module Mapping:
Enter the following settings:
Request Path: *.php
Module: FastCgiModule
Executable:
C:\Program Files\FileMaker\FileMaker Server\Web Publishing\publishing-engine\php\php-cgi.exeName: Enter:
FMIPHPas descriptive name.
Confirm Settings:
Click OK to save the module mapping.
When prompted to allow the FastCGI module for this executable, confirm by clicking Yes.
Step 8: Leveraging PHP Manager for IIS for Optimal Configuration
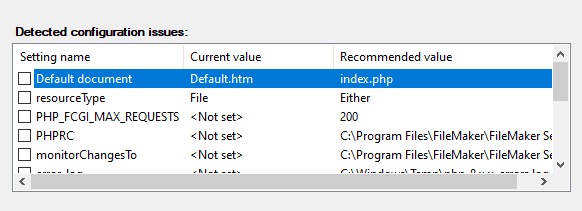
To streamline and optimize the PHP configuration in IIS, using PHP Manager for IIS is highly recommended. This tool automates several configuration tasks and ensures compatibility, particularly for newer PHP versions.
- Install PHP Manager for IIS: Download and install PHP Manager from here if it’s not already installed.
- Automatic PHP Configuration Checks: After installation, open PHP Manager in IIS and navigate to your PHP site configuration. PHP Manager will provide a list of recommended settings for optimal performance and compatibility.
- Apply Recommended Settings: Review and apply the settings suggested by PHP Manager, such as:
cgi.force_redirect = 0cgi.fix_pathinfo = 1- Specifying paths for
error_log,upload_tmp_dir, and other important configurations - Setting appropriate runtime limits and error reporting based on your needs
- Validate and Troubleshoot: PHP Manager also provides quick access to
phpinfo()to verify all configurations. This helps ensure that the PHP settings align with FileMaker Server’s requirements and eliminates potential conflicts.
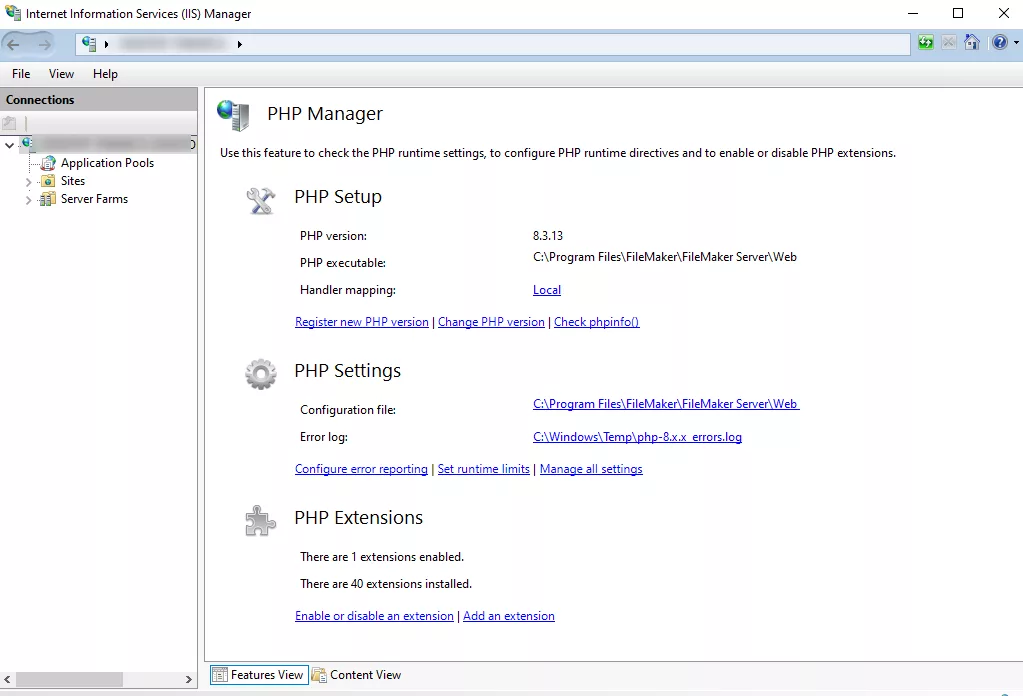
Using PHP Manager simplifies the setup process, reduces manual configuration errors, and improves PHP’s integration with IIS.
Restart IIS:
In IIS Manager, select your server and click Restart in the Actions pane, or use PowerShell:
iisresetStep 9: Restart and Verify Installation
Restart the FileMaker Server to apply changes and re-enable the web publishing services:
net stop "FileMaker Server"
net start "FileMaker Server"Step 10: Check the status of the Server and the status of Custom Web Publishing
In PowerShell type:
fmsadmin get serverconfigto get the status of the Server and
fmsadmin get cwpconfigto get the status of Custom Web Publishing
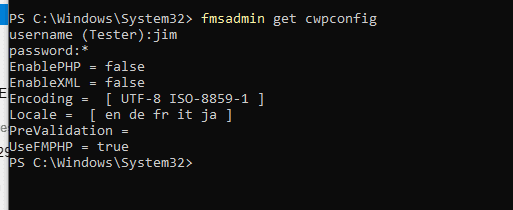
Secure your Server with PreValidation
The PreValidation setting in FileMaker Server controls whether incoming PHP or XML requests undergo preliminary validation before being processed. When PreValidation is set to true, the server would check incoming requests against certain criteria to ensure they’re safe or valid, which can add a layer of security by filtering out potentially malicious or improperly formatted requests. This might prevent some attacks, like SQL injection or malformed request attacks, depending on the specific criteria applied by the server.
How to Enable PreValidation
To set PreValidation = true, you would generally use the fmsadmin CLI tool with a command like this:
fmsadmin set cwpconfig PreValidation=trueAfter running this command, restart the web publishing engine or the FileMaker Server for the change to take effect.
Step 11: Enable XML and PHP Web Publishing
After installing and configuring PHP, you need to enable XML and PHP web publishing in FileMaker Server.
Enable the FileMaker API for XML:
Run the following command in PowerShell (as Administrator):
fmsadmin set cwpconfig enablexml=trueEnable the FileMaker API for PHP:
Run this command to enable PHP web publishing:
fmsadmin set cwpconfig enablephp=true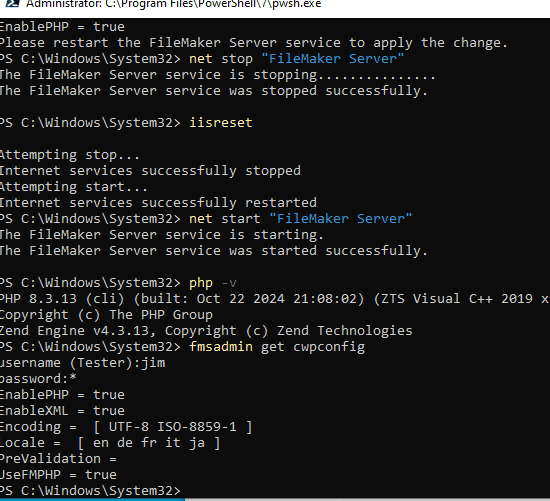
Note: When you change web publishing settings, the Web Publishing Engine restarts, temporarily making web-published databases unavailable. Ensure the engine is not in active use to prevent any web clients from losing unsaved work.
Troubleshooting : Enabling PHP on FileMaker Server with a New PHP Version
In certain cases, FileMaker Server might resist enabling PHP if a new, unsupported PHP version is used directly. To work around this:
- Replace with Default PHP: Temporarily replace the PHP installation folder with the default PHP 7.4.9 folder that came with FileMaker 19.1. This is necessary to “convince” FileMaker Server to enable PHP.
- Enable PHP: Run the
fmsadmin set cwpconfig enablephp=truecommand, which should now successfully enable PHP. - Revert to Desired PHP Version: Once PHP is enabled, replace the PHP 7.4.9 folder with the newer PHP 8.x folder (or any desired version), configured with AirMoi’s PHP API for FileMaker.
- Restart Services: Restart IIS and FileMaker Server services to apply the changes. Now, the setup should work seamlessly with the updated PHP version.
You can download the default 7.4.9 PHP folder from here
Step 12: Test PHP Integration with FileMaker Server
Create a PHP Test File:
Place a file named phpinfo.php in the FileMaker Server’s web documents
C:\Program Files\FileMaker\FileMaker Server\HTTPServer\conf\phpinfo.phpAdd the following content to test PHP configuration:
<?php

phpinfo( );

?>Access the Test File:
Open a browser and go to
<a href="http://localhost:16000/phpinfo.php.">http://localhost/phpinfo.php</a>You should see the PHP information page, confirming PHP is properly configured.
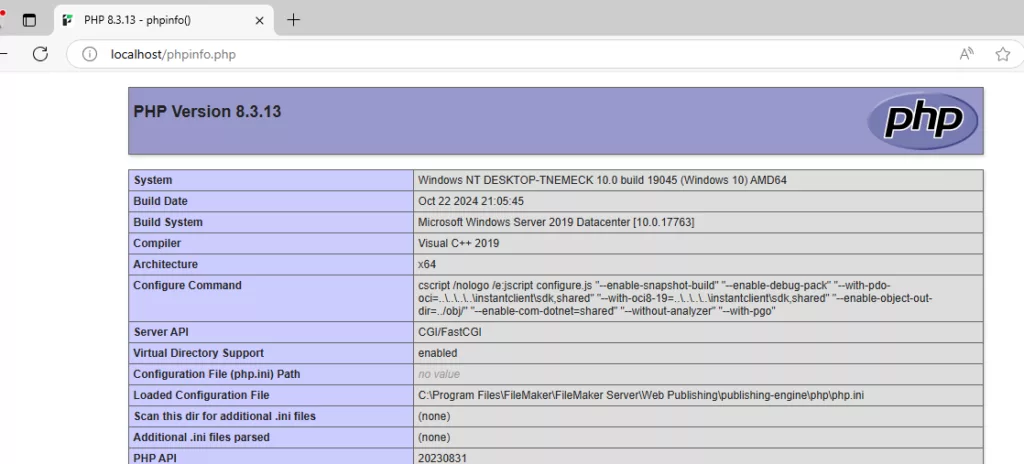
Step 13: Test Custom Web Publishing with FileMaker PHP API
Create a Database Connection Test Script:
Create a PHP file, phptest.php, in the web document directory to test the FileMaker PHP API connection:
<!DOCTYPE html>
<html>
<head>
    <title>FileMaker API Test</title>
    <meta charset="UTF-8">
    <style>
        body { font-family: Arial, sans-serif; }
        table { width: 100%; border-collapse: collapse; margin-top: 20px; }
        th, td { padding: 8px; text-align: left; border: 1px solid #ddd; }
        th { background-color: #f4f4f4; }
    </style>
</head>
<body>
    <h1>FileMaker API Test</h1>
    <pre>
<?php
// Adjust the include path for the autoloader.php file as per your setup
set_include_path(get_include_path() . PATH_SEPARATOR . 'C:/Program Files/FileMaker/FileMaker Server/Web Publishing/publishing-engine/php');
require 'autoloader.php';

// Define missing CURLOPT constants if they aren't already defined
if (!defined('CURLOPT_SSL_VERIFYPEER')) {
    define('CURLOPT_SSL_VERIFYPEER', 64);
}
if (!defined('CURLOPT_SSL_VERIFYHOST')) {
    define('CURLOPT_SSL_VERIFYHOST', 81);
}
if (!defined('CURLOPT_HTTPAUTH')) {
    define('CURLOPT_HTTPAUTH', 107);
}
if (!defined('CURLOPT_USERPWD')) {
    define('CURLOPT_USERPWD', 10005);
}
if (!defined('CURLAUTH_BASIC')) {
    define('CURLAUTH_BASIC', 1);
}

// Import AirMoi API classes
use airmoi\FileMaker\FileMaker;
use airmoi\FileMaker\FileMakerException;

try {
    echo "==========================================" . PHP_EOL;
    echo " FILEMAKER API UNIT TEST" . PHP_EOL;
    echo "==========================================" . PHP_EOL . PHP_EOL;

    // Initialize FileMaker object with your database details
    // Note: Replace 'username' and 'password' with valid credentials
    // $fm = new FileMaker('FMServer_Sample', 'localhost', 'username', 'password');
     // Initialize FileMaker object without authentication (assuming guest access)
     $fm = new FileMaker('FMServer_Sample', 'localhost', null, null);

    // Display API and server version information
    echo "API version : " . $fm->getAPIVersion() . PHP_EOL;
    echo "Min server version : " . $fm->getMinServerVersion() . PHP_EOL . PHP_EOL;

    // Specify the layout to use
    $layoutName = 'PHP Technology Test'; // Replace with your actual layout name

    // Retrieve layout and list fields
    echo "Getting layout and fields..." . PHP_EOL;
    $layout = $fm->getLayout($layoutName);
    $fields = $layout->listFields();
    echo "Fields: " . implode(', ', $fields) . PHP_EOL . PHP_EOL;

    // Retrieve all records from the specified layout
    echo "Retrieving records..." . PHP_EOL;
    $findAll = $fm->newFindAllCommand($layoutName);
    $result = $findAll->execute();

    // Check if the result is an error
    if (FileMaker::isError($result)) {
        throw new FileMakerException($result->getMessage(), $result->getCode());
    }

    $records = $result->getRecords();
    $recordCount = count($records);
    echo "Total Records Found: $recordCount" . PHP_EOL;

    // Display records in an HTML table
    echo "</pre><table><tr>";
    foreach ($fields as $field) {
        echo "<th>" . htmlspecialchars($field) . "</th>";
    }
    echo "</tr>";

    foreach ($records as $record) {
        echo "<tr>";
        foreach ($fields as $field) {
            echo "<td>" . htmlspecialchars($record->getField($field)) . "</td>";
        }
        echo "</tr>";
    }
    echo "</table><pre>";

} catch (FileMakerException $e) {
    // Handle FileMaker API exceptions
    echo PHP_EOL . "EXCEPTION :" . PHP_EOL;
    echo "  - Code :" . $e->getCode() . PHP_EOL;
    echo "  - Message :" . $e->getMessage() . PHP_EOL;
} catch (Exception $e) {
    // Handle general exceptions
    echo PHP_EOL . "EXCEPTION :" . PHP_EOL;
    echo "  - Code :" . $e->getCode() . PHP_EOL;
    echo "  - Message :" . $e->getMessage() . PHP_EOL;
}
?>
    </pre>
</body>
</html>
Run the Test Script:
Navigate to the test script’s URL in your browser. If it shows records from the FMServer_Sample FileMaker database, the PHP API connection is working correctly.
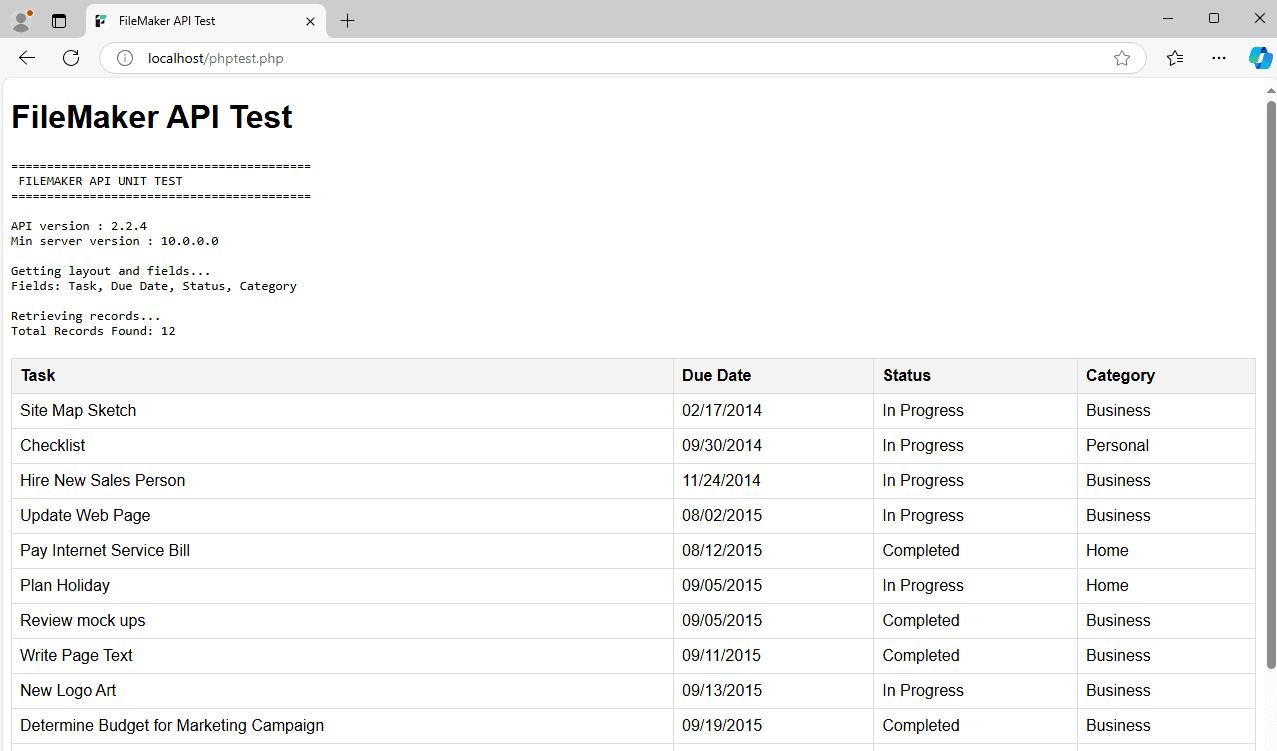
Step 14: Enjoy Secure, updated and widely known PHP with your Claris FileMaker Server
This setup should have PHP 8.3 fully integrated with FileMaker Server 21, optimized with FastCGI in IIS, and correctly configured for custom web publishing.


