If you’re stepping into the world of database management and development with Claris FileMaker Server, you might know that officially, it’s supported only on server editions of Windows. Despite this, there’s a way to set it up on Windows 10/11 for testing or development purposes. Here’s how you can do it.
Disclaimer
Before we proceed, it’s important to note that running FileMaker Server on non-server Windows editions is not supported by Claris. This guide is intended for educational purposes or for setting up a test environment.
Step-by-Step Installation

Setting up a test environment for Claris FileMaker Server on Windows 10 or 11 involves several steps, one of which includes enabling specific IIS-related features. Here’s a step-by-step guide to help you get started, especially if you’re new to this process.
Step 1: Access Windows Features
- Open Control Panel:
- Click on the Start menu.
- Type Control Panel and hit Enter.
- Turn Windows features on or off:
- In the Control Panel, click on Programs.
- Under Programs and Features, click Turn Windows features on or off.
Step 2: Enable IIS-Related Features
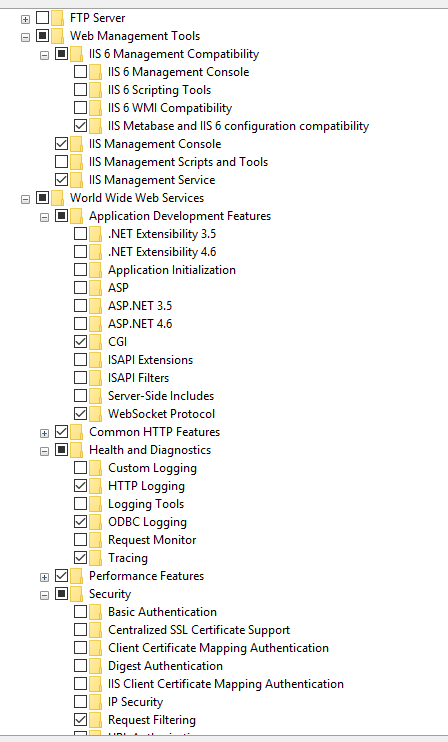
In the Windows Features dialog, you will need to expand several sections and check specific features. Follow the structure as shown in the provided screenshot:
- FTP Server Do not check
- Web Management Tools:
- Expand Web Management Tools.
- Check the following:
- IIS 6 Management Compatibility partial checks:
- IIS Metabase and IIS 6 configuration compatibility check
- IIS 6 Management Compatibility partial checks:
- IIS Management Console expand and check everything inside
- IIS Management Service expand and check everything inside
- World Wide Web Services partial checks:
- Expand World Wide Web Services.
- Expand Application Development Features:
- Check the only following:
- CGI
- WebSocketProtol
- Check the only following:
- Expand Common HTTP Features:
- expand and check everything inside
- Expand Health and Diagnostics:
- Check the only following:
- HTTP Logging
- ODBC Logging
- Tracing
- Check the only following:
- Expand Performance Features:
- expand and check everything inside
- expand and check everything inside
- Expand Security:
- Check the only the following:
- Request Filtering
Step 3: Confirm and Apply Changes
After checking all the required features:
- Click OK.
- Windows will search for the required files and apply the changes. This might take a few minutes.
Step 4: Restart Your Computer
Once the features are applied, restart your computer to ensure all changes take effect properly.
After installing FileMaker Server:
- Check for updates: Always make sure you have the latest version of FileMaker Server installed for optimal performance and security.
- Backup regularly: Even though it’s just a test environment, make it a habit to back up your databases regularly.
- Monitor performance and logs: Regularly check the IIS logs and FileMaker Server logs for any unusual activity or errors.
Setting up a test environment for Claris FileMaker Server on a non-server edition of Windows might be useful for developers and those new to FileMaker. However, always remember this setup is only for testing or development purposes and is not meant for production environments. As you grow in your FileMaker journey, you should invest in a supported server environment to take full advantage of what FileMaker has to offer.
Happy testing!


